Normale Sitze der Serie 3 (oder allgemein der Serie F) sind nicht bequem und sehen nicht gut aus. Das ist eine Tatsache. Die meisten Besitzer von Nicht-M-Fahrzeugen wollen ein kleines Stück vom ///M-Kuchen abhaben, indem sie entweder M-Plaketten an ihren Autos anbringen, M-Kühlergrills, Motorhauben usw. (Das sind zwar einige reizvolle Modifikationen, aber immerhin...)
Das ist keine wirkliche Verbesserung, eher ein Komfort-Upgrade. Wir haben seit dem ersten Tag das Gefühl, dass die Sitze in einem F30 weder gut aussehen, noch bequem sind. Das war der Hauptgrund für ein Upgrade und wir stießen auf eine Firma, die M2 Competition Sitze aus einem BMW Testfahrzeug verkaufte, das nur ca. 8.000 km gelaufen war, bevor es demontiert wurde 🙁.
Sie waren also ziemlich neu, man kann immer noch das wunderbare Leder riechen. Allerdings, und das ist der Trick an dieser Modifikation... durch das Lesen von Foren, Gespräche mit BMW-Händlern und Tuning-Shops, mussten wir der kalten Realität ins Auge sehen, dass diese Sitze passen nicht in eine Limousine wie beim F30 benötigen Sie Sitze aus einem F80. Warum, werden Sie fragen? Weil die Sicherheitsgurte unterschiedlich angebracht sind. In einer Limousine sind die Sicherheitsgurte an den Sitzen selbst befestigt, in einem Coupé - wie dem M2 Competition - sind die Gurte an der Karosserie befestigt. Und wenn Sie die Coupé-Sitze haben, können Sie den Sicherheitsgurt nicht daran befestigen, das ist einfach nicht möglich. (und bitte denken Sie nicht einmal daran, ein Loch in den Sitzrahmen zu bohren und den Sicherheitsgurt dort zu befestigen... es ist Ihr Leben, und Sie haben nur eines, also riskieren Sie es nicht)
Aber wir dachten, das kann nicht wahr sein. Leider ist es so. Wenn Sie einen M2 oder M4 Sitz haben und diesen in Ihren Limousinen-BMW einbauen wollen, werden sie nicht funktionieren. Am besten ist es, Sie suchen sich ein paar M3-Sitze und verwenden sie, die sind einfach Plug and Play (und etwas Codierung).
Allerdings.... Sie wir haben einen Weg gefunden um sie in Ihr Auto einzubauen, zeigen wir Ihnen, wie:
Was Sie brauchen:
- Viel Geduld und Wille
- Da Sie dies wahrscheinlich zum ersten Mal tun, werden Sie eine Menge neuer Kunststoffe und Mechanismen kennenlernen, die Sie vorher nicht kannten, also haben Sie Geduld, es wird funktionieren.
- Eine Menge Werkzeuge
- Wir werden sie vor jedem Abschnitt auflisten, damit Sie wissen, worum es geht und was Sie für den jeweiligen Teil brauchen
- Ersatzteile
- Die Schrauben in den Sitzen sind mit einem bestimmten Anzugsmoment versehen, und deshalb können einige von ihnen nicht wiederverwendet werden (oder sollten es zumindest nicht). Sie müssen neue Schrauben kaufen und diese verwenden, wenn Sie die Sitze zusammenbauen.
- Lichter und Tisch
- Wenn Sie in einem dunkleren Bereich arbeiten, besorgen Sie sich eine Lampe und stellen Sie die Sitze auf etwas, so dass es etwas einfacher zu manövrieren ist und Sie tatsächlich sehen, was Sie tun.
- Einige Teile, die bei den neuen Sitzen fehlen könnten
- Einige Schutzhüllen, Mikrofasertücher zur Vermeidung von Kratzern
Ein paar Hintergrundinformationen
We knew it was possible (deep down), since the M2 Competition and M3/M4 seats are pretty much the same. So we did a little digging, if you go to https://www.realoem.com and look for an M3 and an M2 Competition, under the Seats section you’ll find that the top frame and the cushion is the same (leather is also, kinda, design wise they are different a bit). And if you dig a bit more, you’ll find out that the bottom frame of the F30 seats are the same as the ones from the F80. Soooo, that can only mean one thing. If you take the top part – as is – from the M2 Comp seats, and the bottom frame of your seats, and put them together (plus the cushion and leather from the M2), you’ll get a working seat in your F30. 🎉
Sie müssen also Folgendes tun:
- Entfernen Sie den unteren Schaumstoff und das Leder von Ihren Spendersitzen - in unserem Fall vom M2 Competition
- Entfernen Sie den oberen Teil des Sitzes von den Spendersitzen
- Entfernen Sie den oberen Teil des Sitzes von Ihrem eigene Sitze
- Entfernen Sie den unteren Schaumstoff und das Leder von Ihrem eigene Sitze (wenn Sie eine Oberschenkelauflage haben, müssen Sie auch diese entfernen)
- Montieren Sie den unteren Schaumstoff und das Leder von den Spendersitzen auf Ihre Sitze.
- Montieren Sie den oberen Teil des Sitzes von den Spendersitzen auf Ihren
- Setzen Sie die Teile wieder zusammen und bauen Sie die Sitze wieder in Ihr Fahrzeug ein.
- Tanzen Sie und fahren Sie herum. 😎

1. Entfernen des unteren Schaums + Leders von den Spendersitzen (M2/M4)
Eine Liste der Werkzeuge, die Sie für diese "Operation" benötigen:
- Torx-Schraubendreher
- T25, T27
- ein paar flache Schraubendreher (kleine, schmale)
- Einige Pickwerkzeuge und Plastikzangen
- Handschuhe
- wenn Sie sich nicht schmutzig machen wollen
- Einige Papierhandtücher
- zum Reinigen der Finger, wenn sie ölig oder schmutzig werden
Das müssen Sie tun.
- Stellen Sie den Sitz auf den Boden oder auf einen Tisch.
- Klappen Sie den Sitz nach hinten, so dass Sie Zugang zum unteren Teil des Sitzes haben.

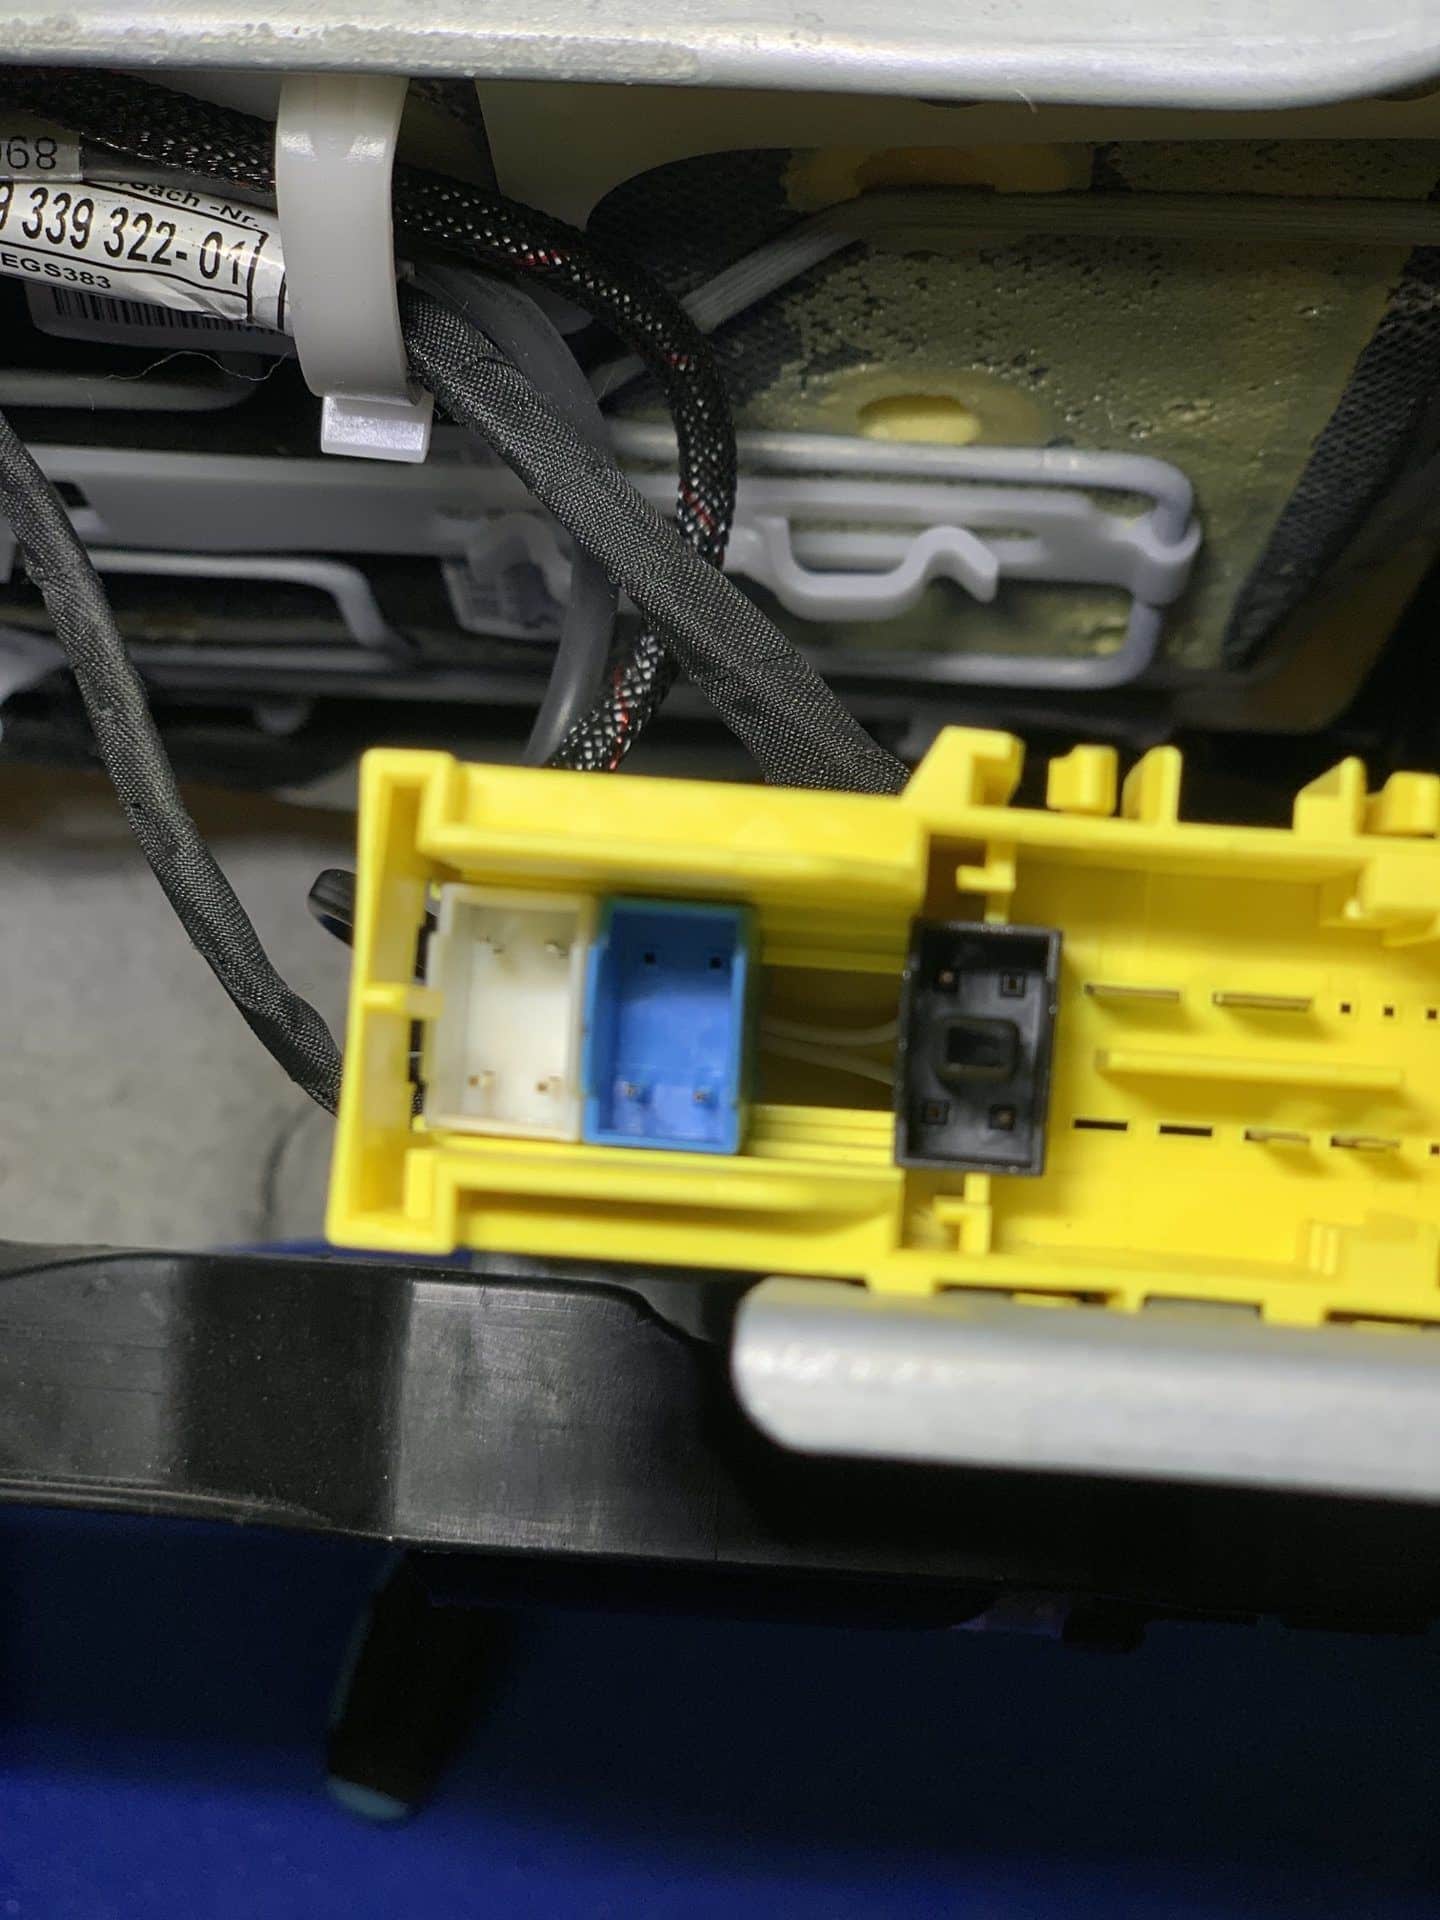
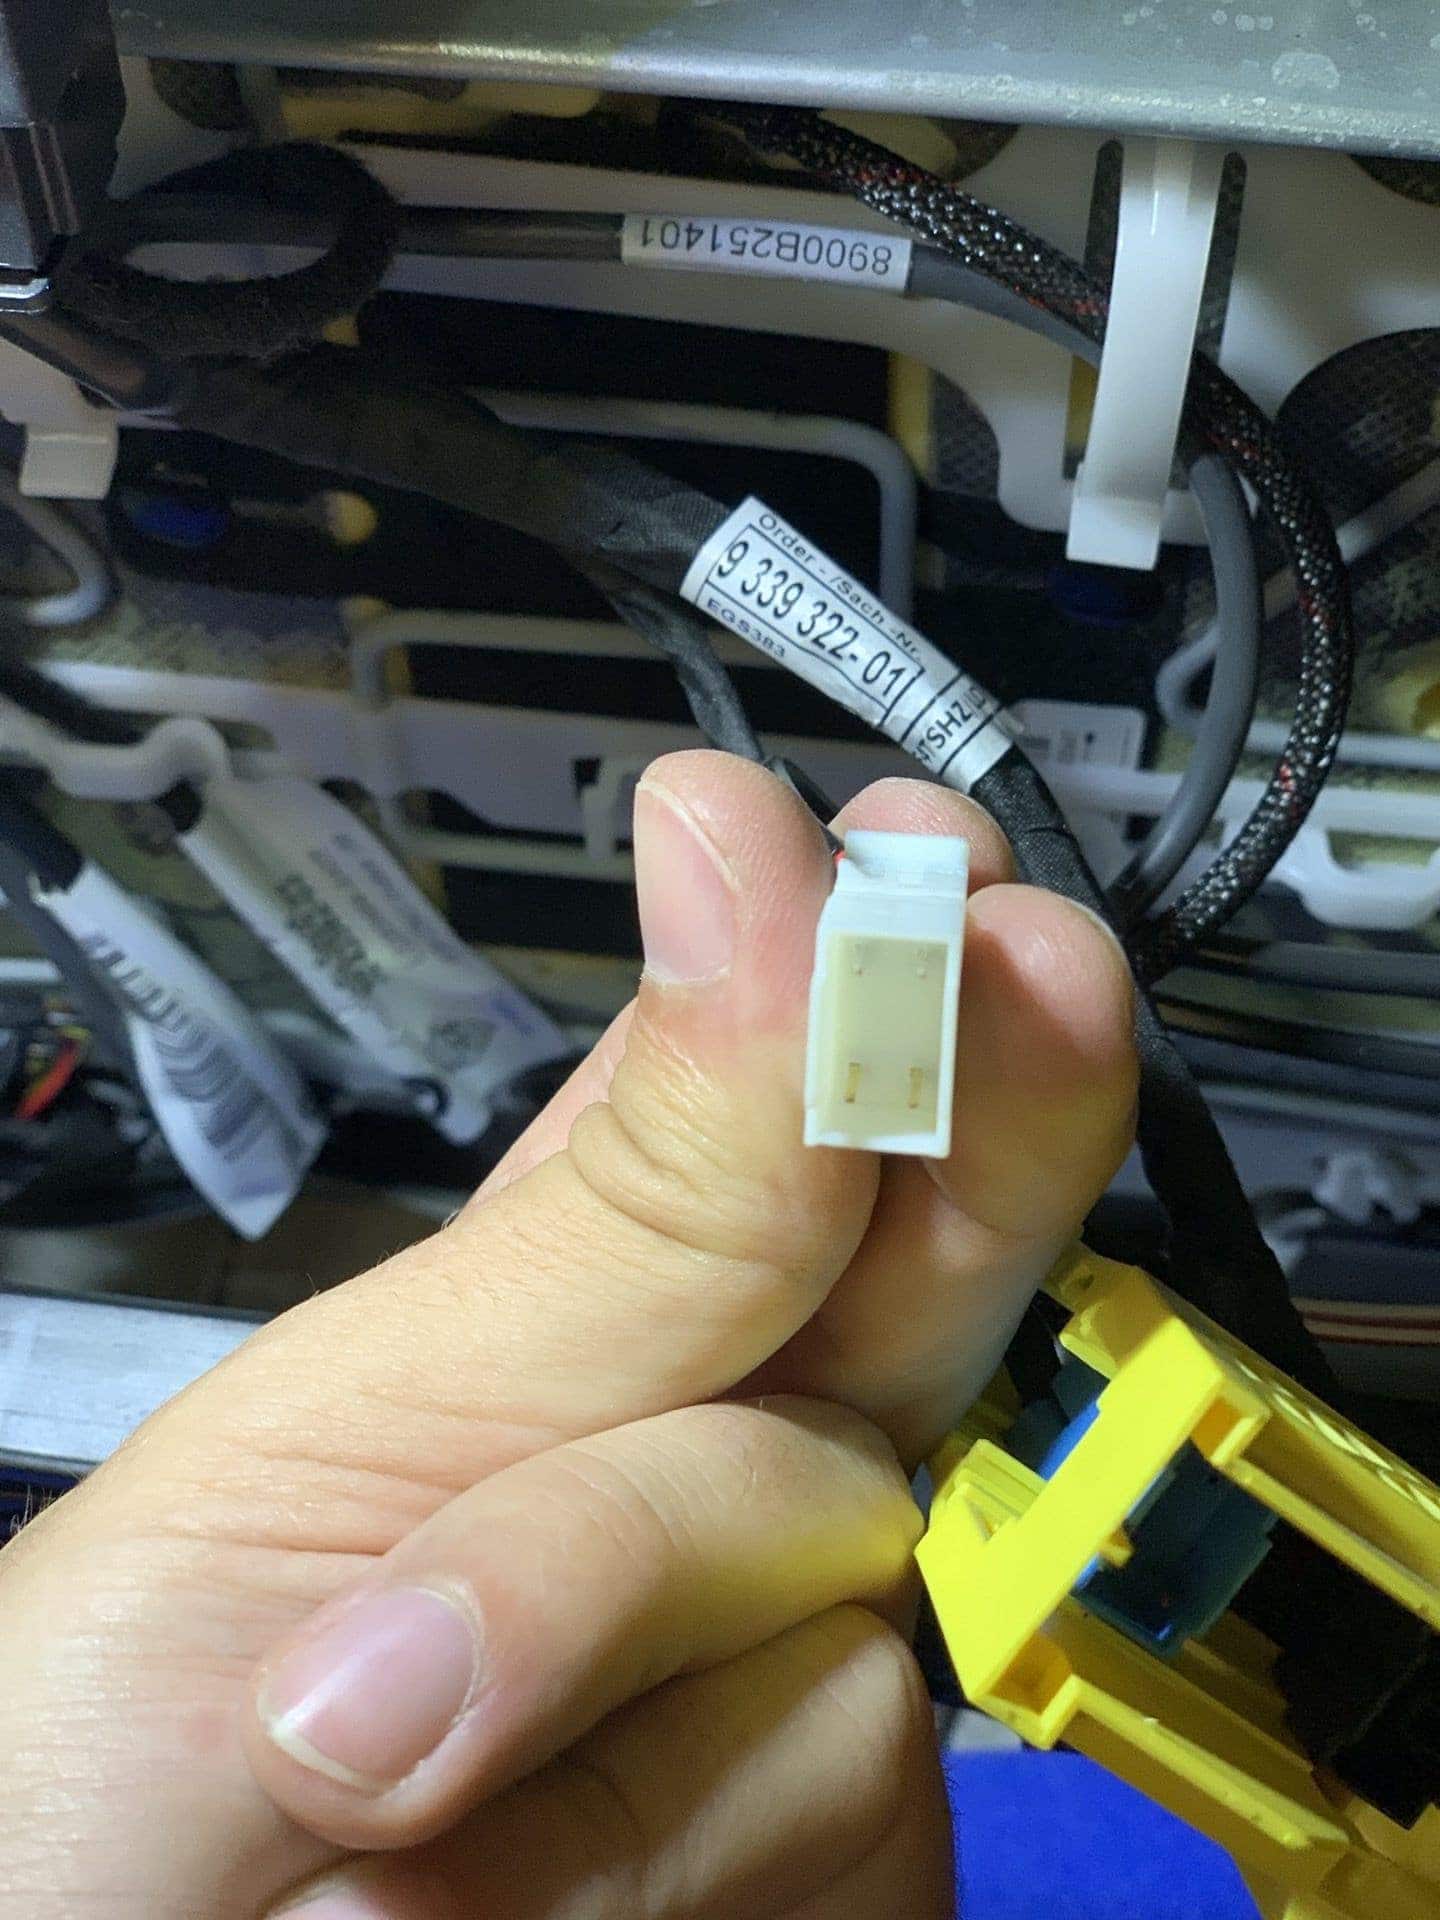
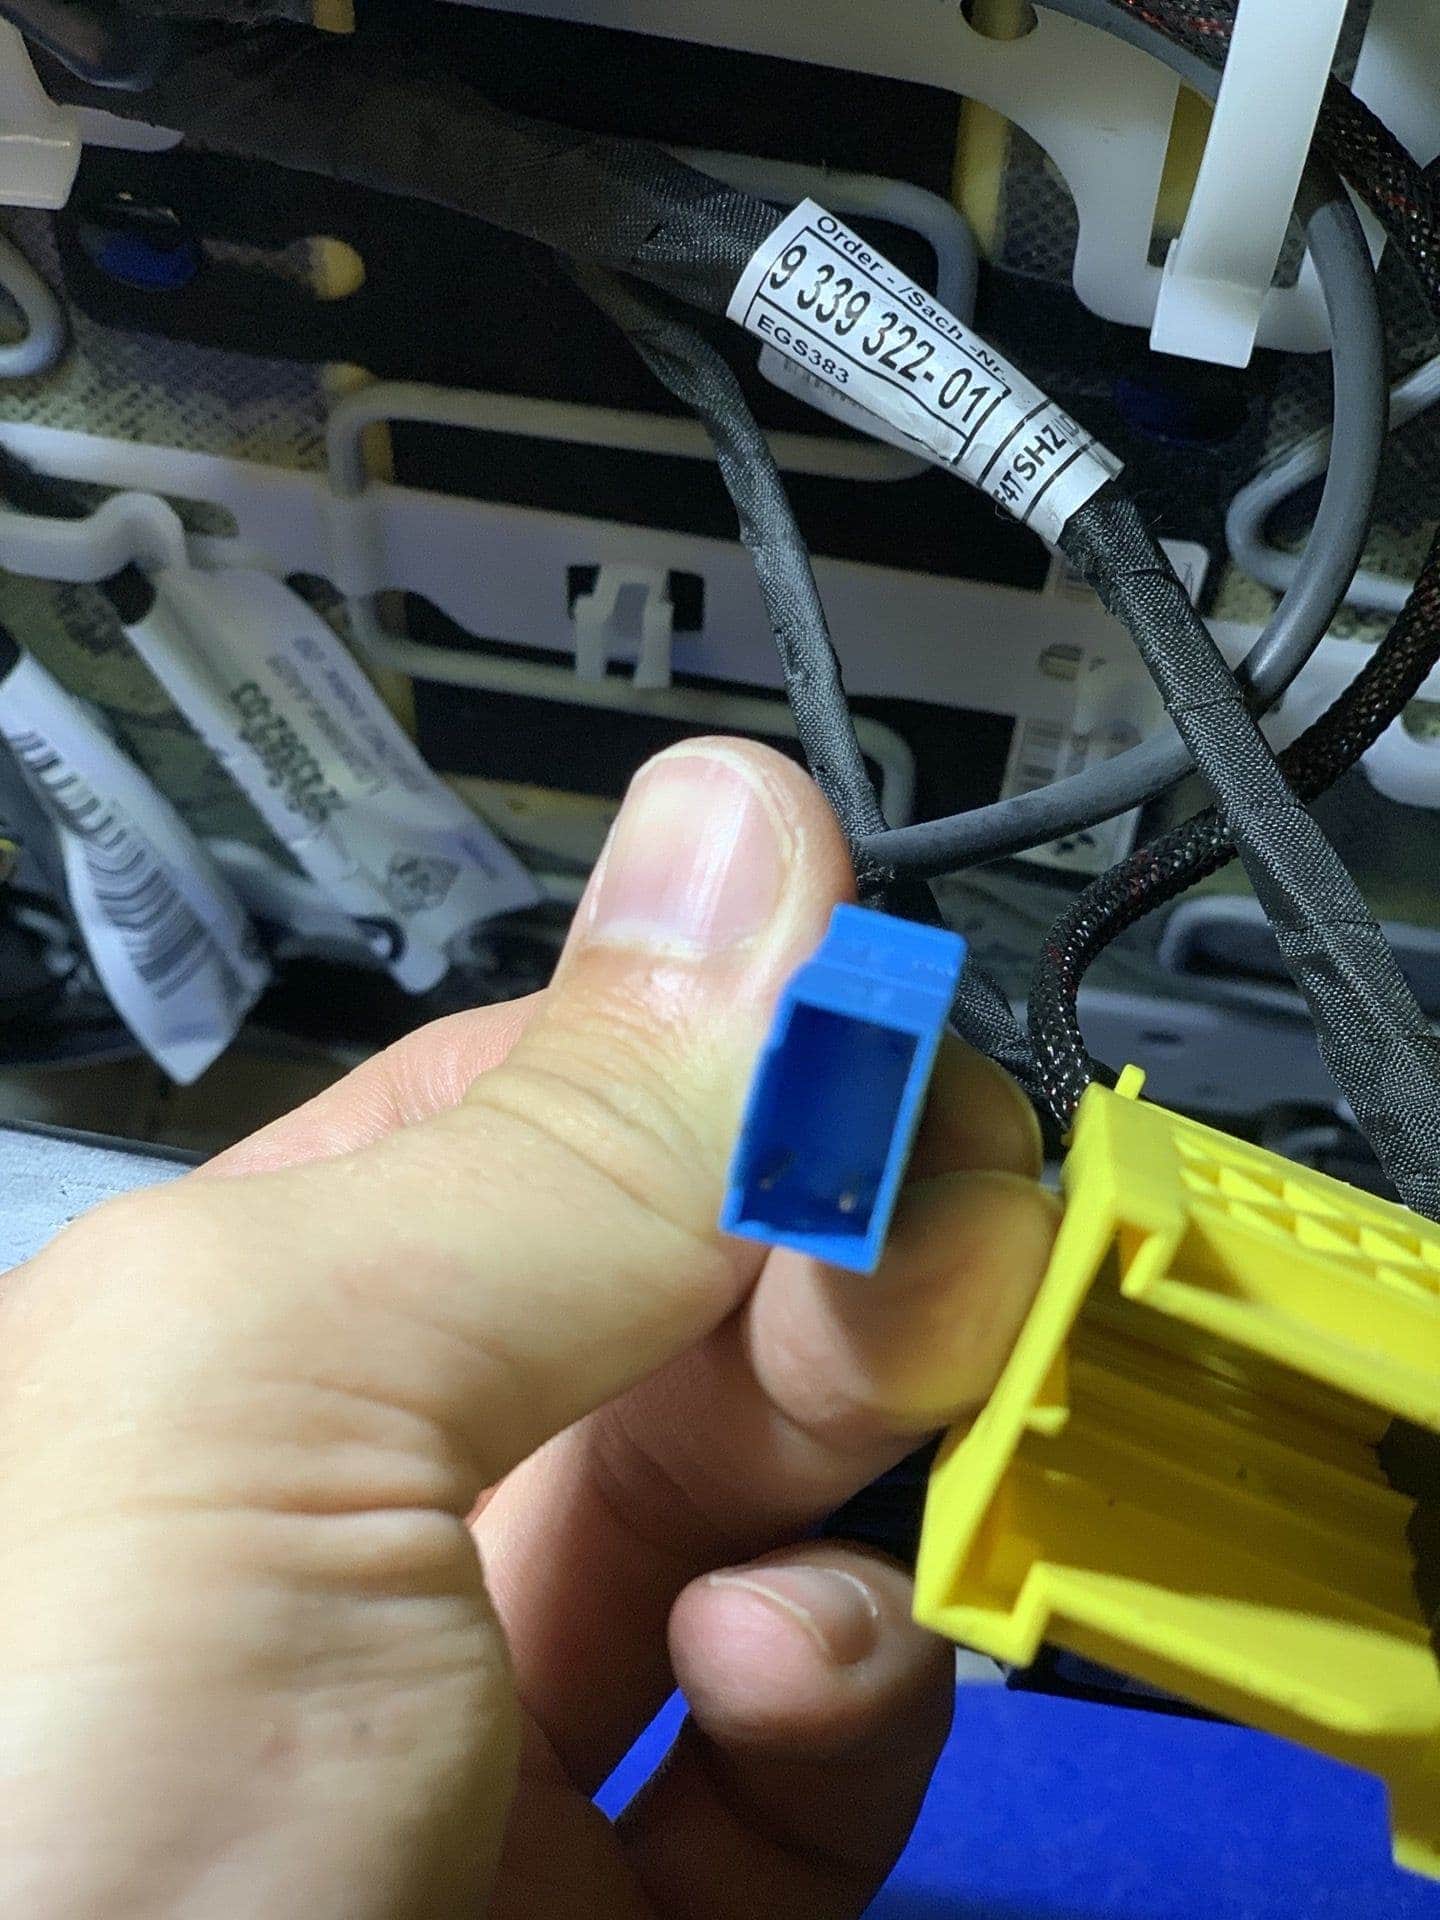
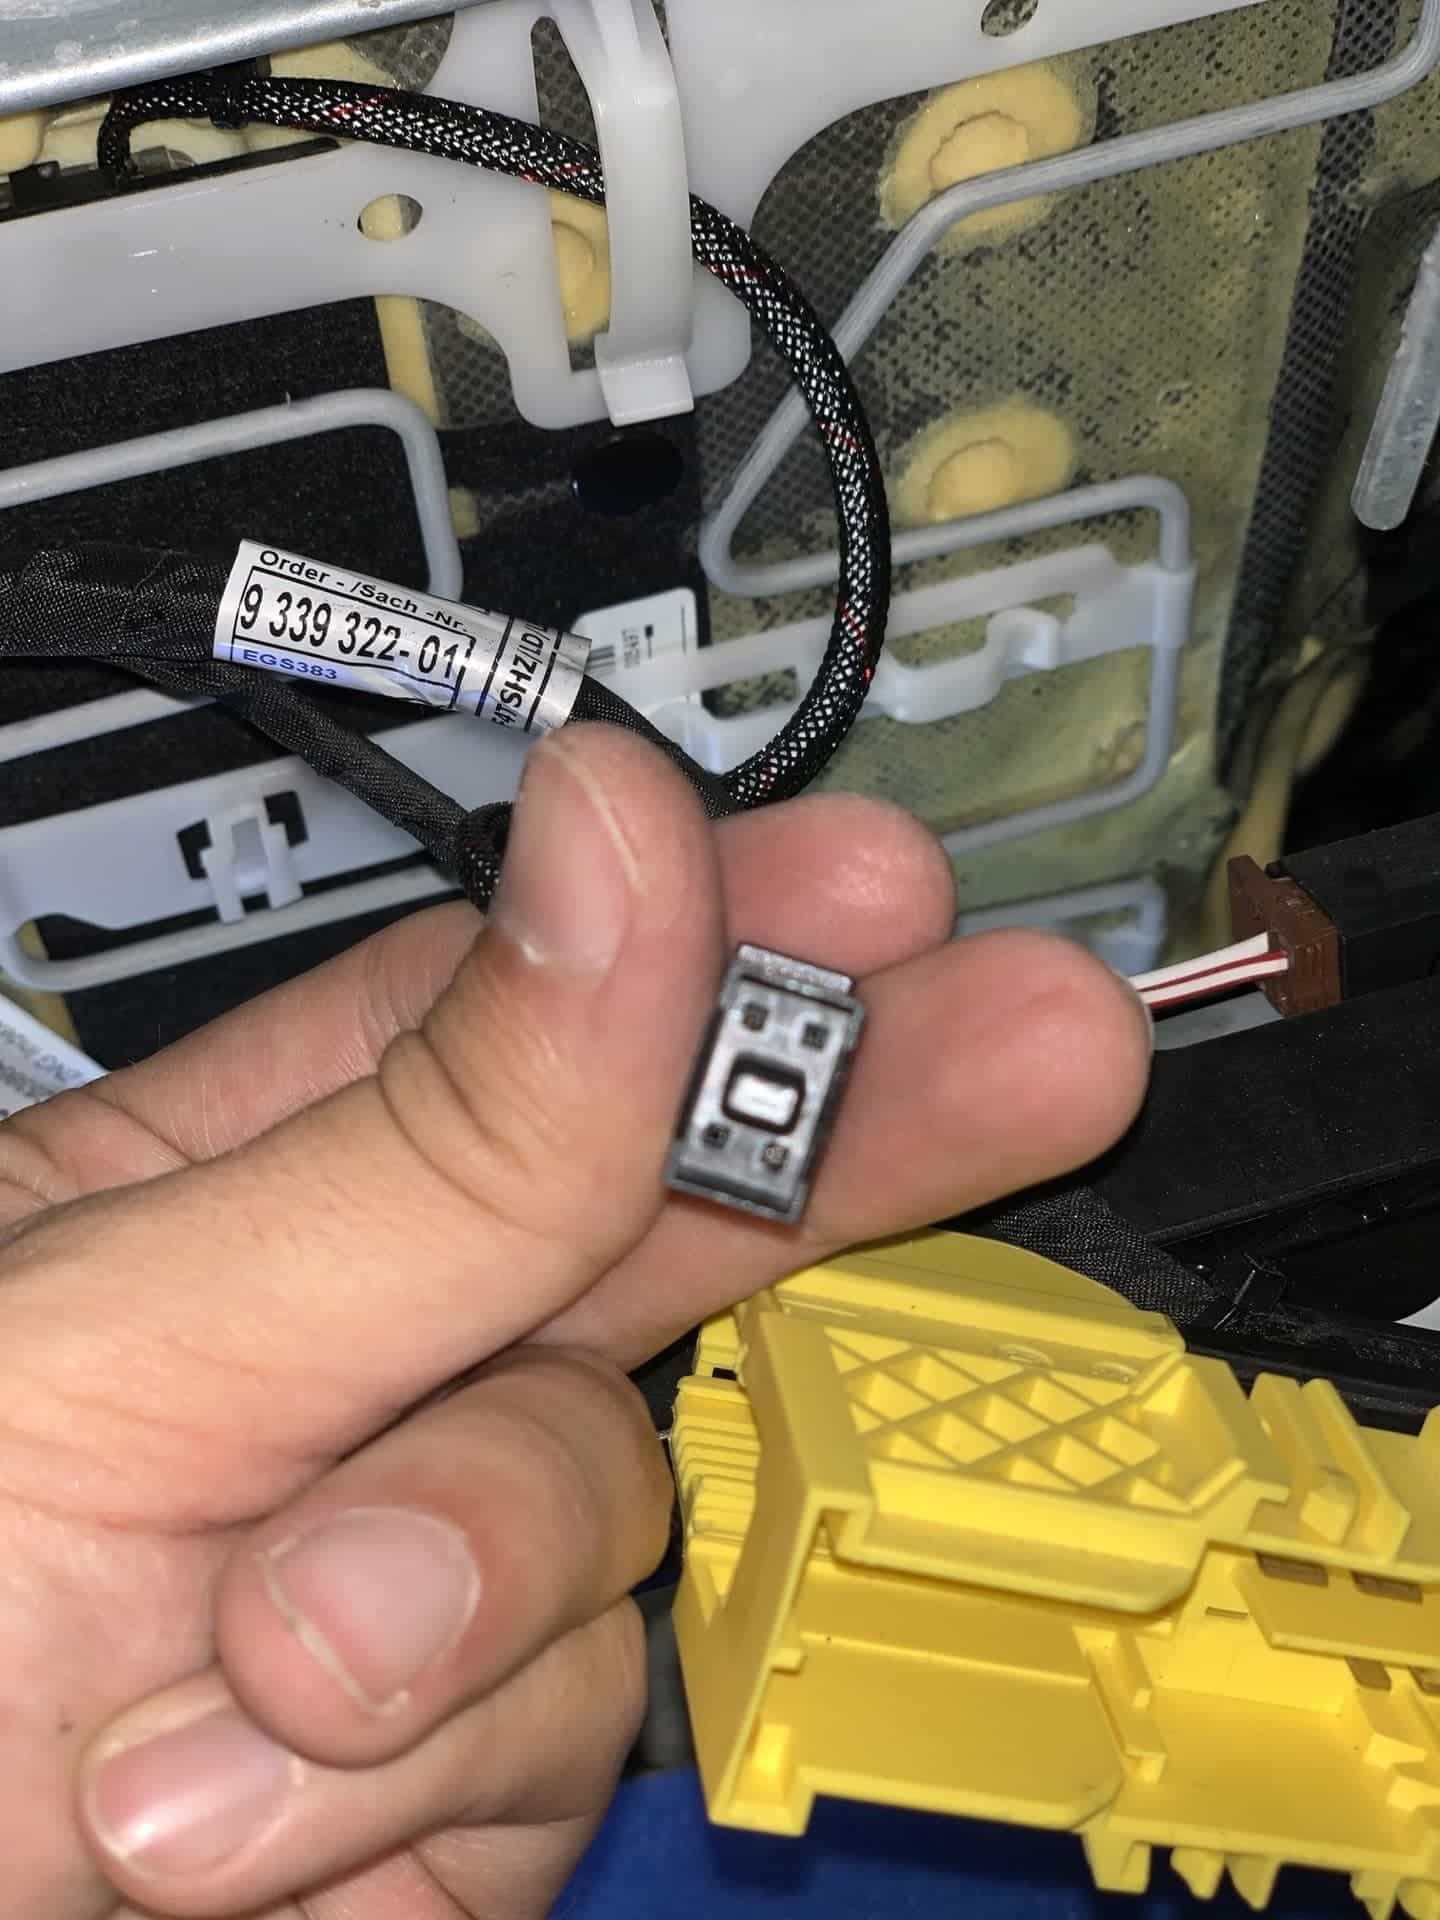
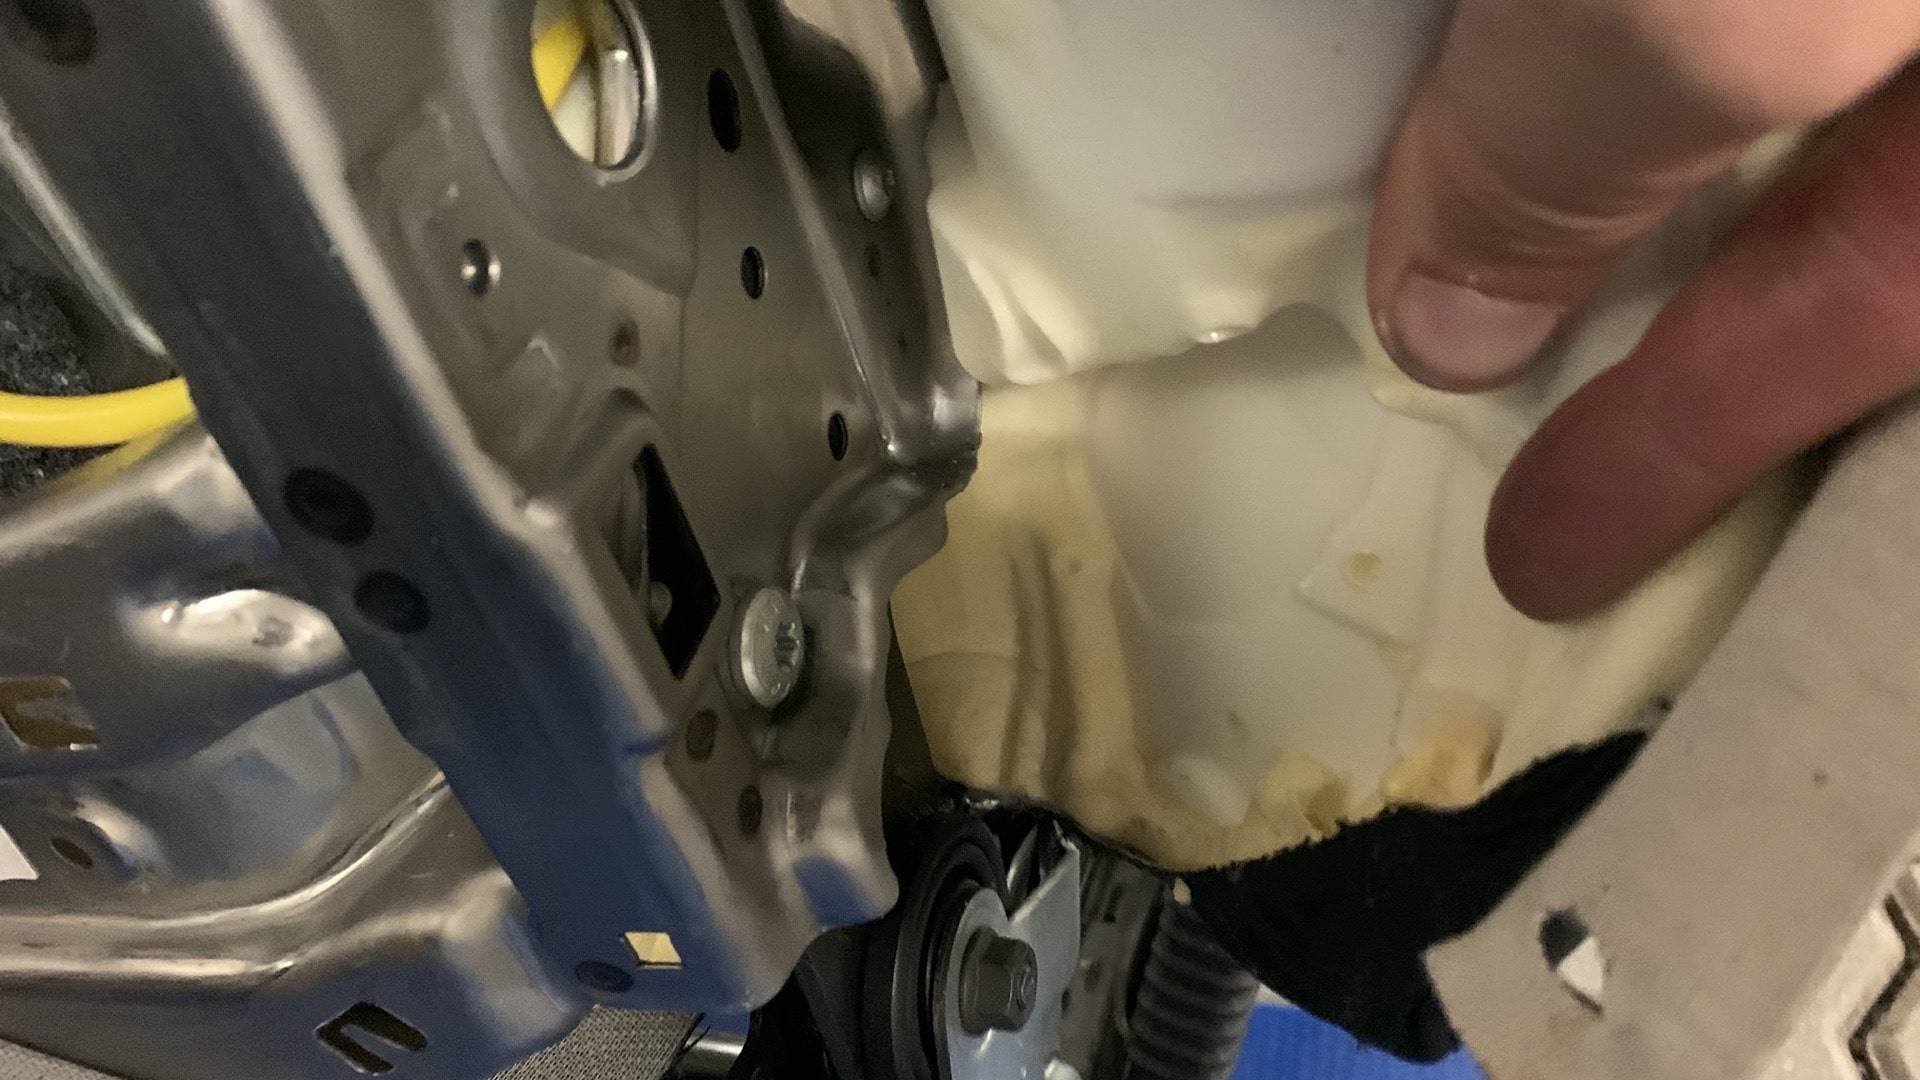
3. Als erstes müssen Sie die Sitzheizung und den Beifahrersitzsensor ausbauen. Dazu müssen Sie zuerst den Kabelbinder am gelben Steckergehäuse durchschneiden, der die Kabel zusammenhält (der blaue Stecker ist für den Airbag, der weiße für den Gurtstraffer und der schwarze für die Sitzheizung - der schwarze wird an eine andere Box angeschlossen, achten Sie auf das Wort "Heizung"). Wenn Sie das durchgeschnitten haben, müssen Sie die Kabel eines nach dem anderen heraushebeln. Jedes Kabel hat seinen eigenen kleinen Stift an der Seite, den Sie anheben oder drücken müssen, um es zu lösen. Das erste Kabel wird mit 2 Stiften auf jeder Seite festgehalten.

4. Sobald Sie das haben, schieben Sie sie vorsichtig heraus und legen Sie sie zur Seite, wir kümmern uns nur um die eine für die Sitzheizung. Um sie zu lösen, müssen Sie sie aus den kleinen Klammern führen, die sie am Sitz festhalten, und es gibt einen zusätzlichen Kabelbinder an der Unterseite, den Sie zum Beispiel mit zwei Schlitzschraubenziehern aufhebeln können.

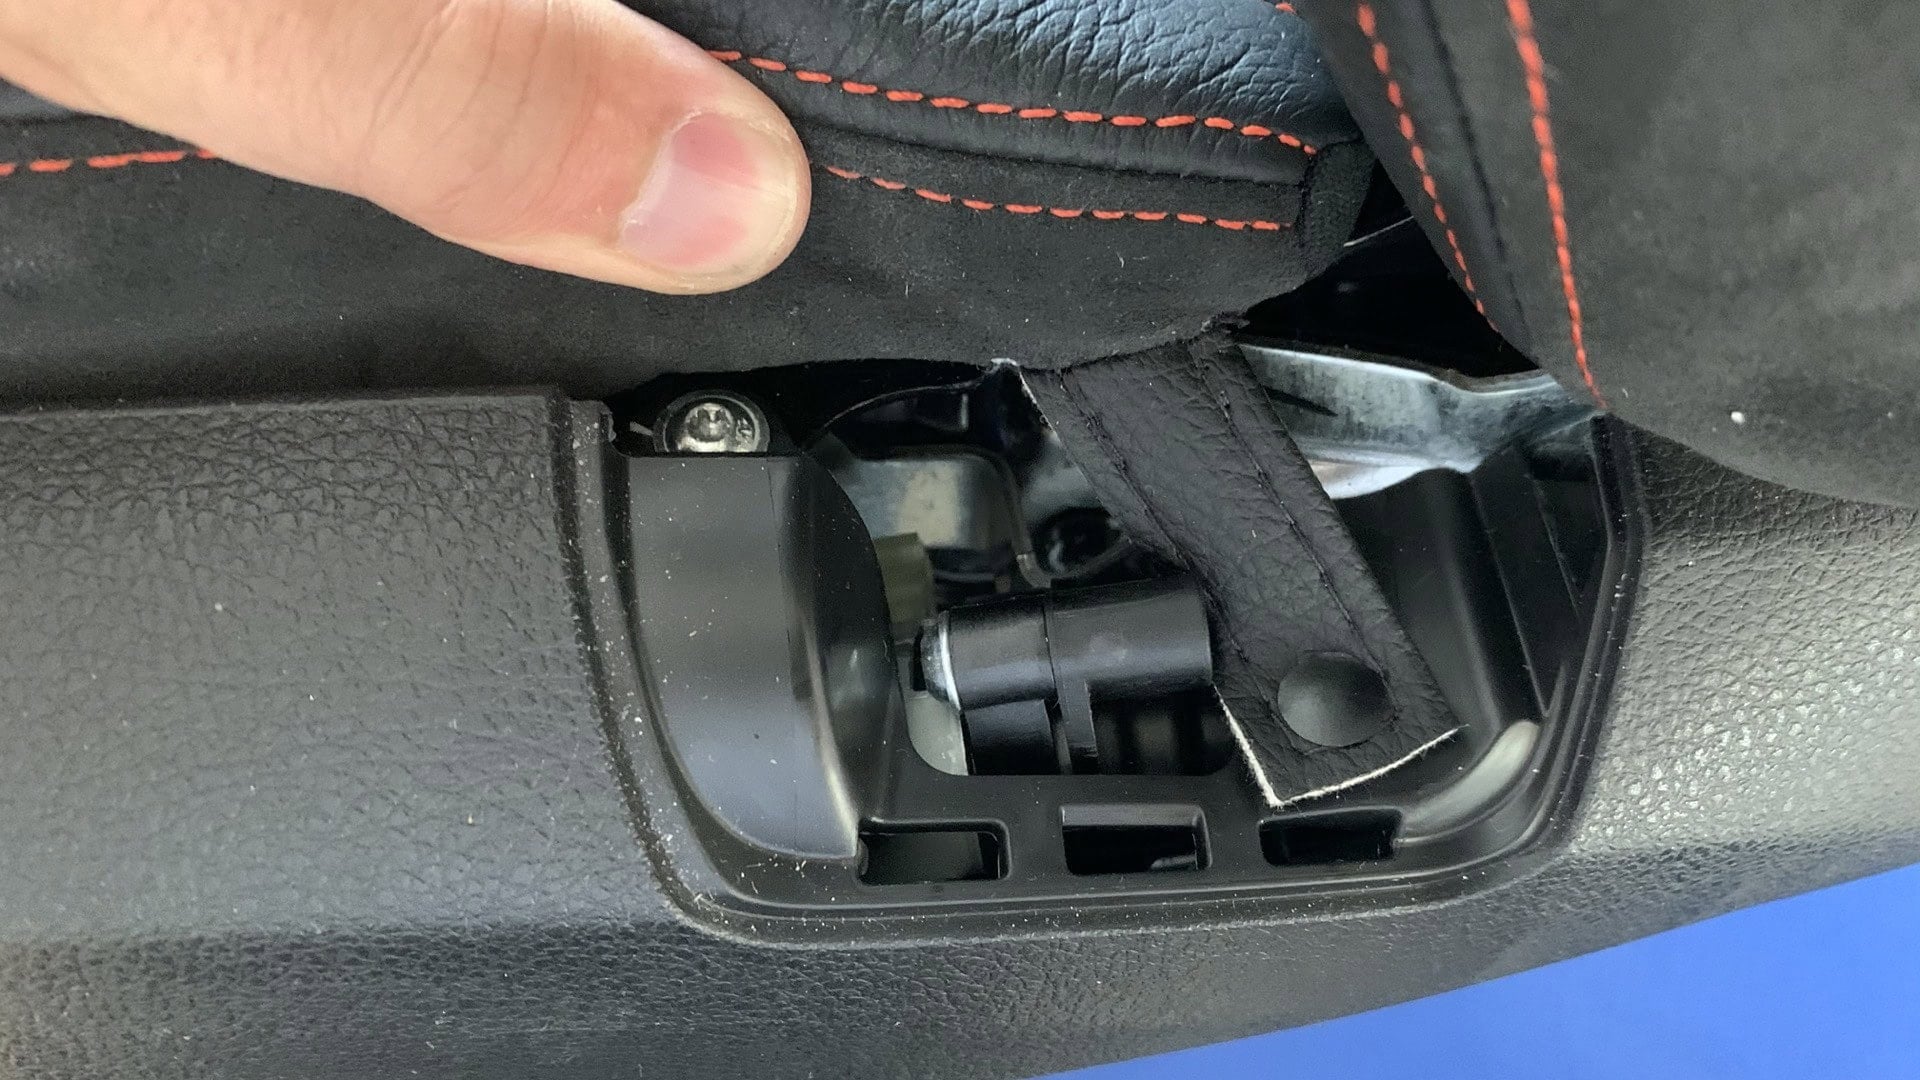
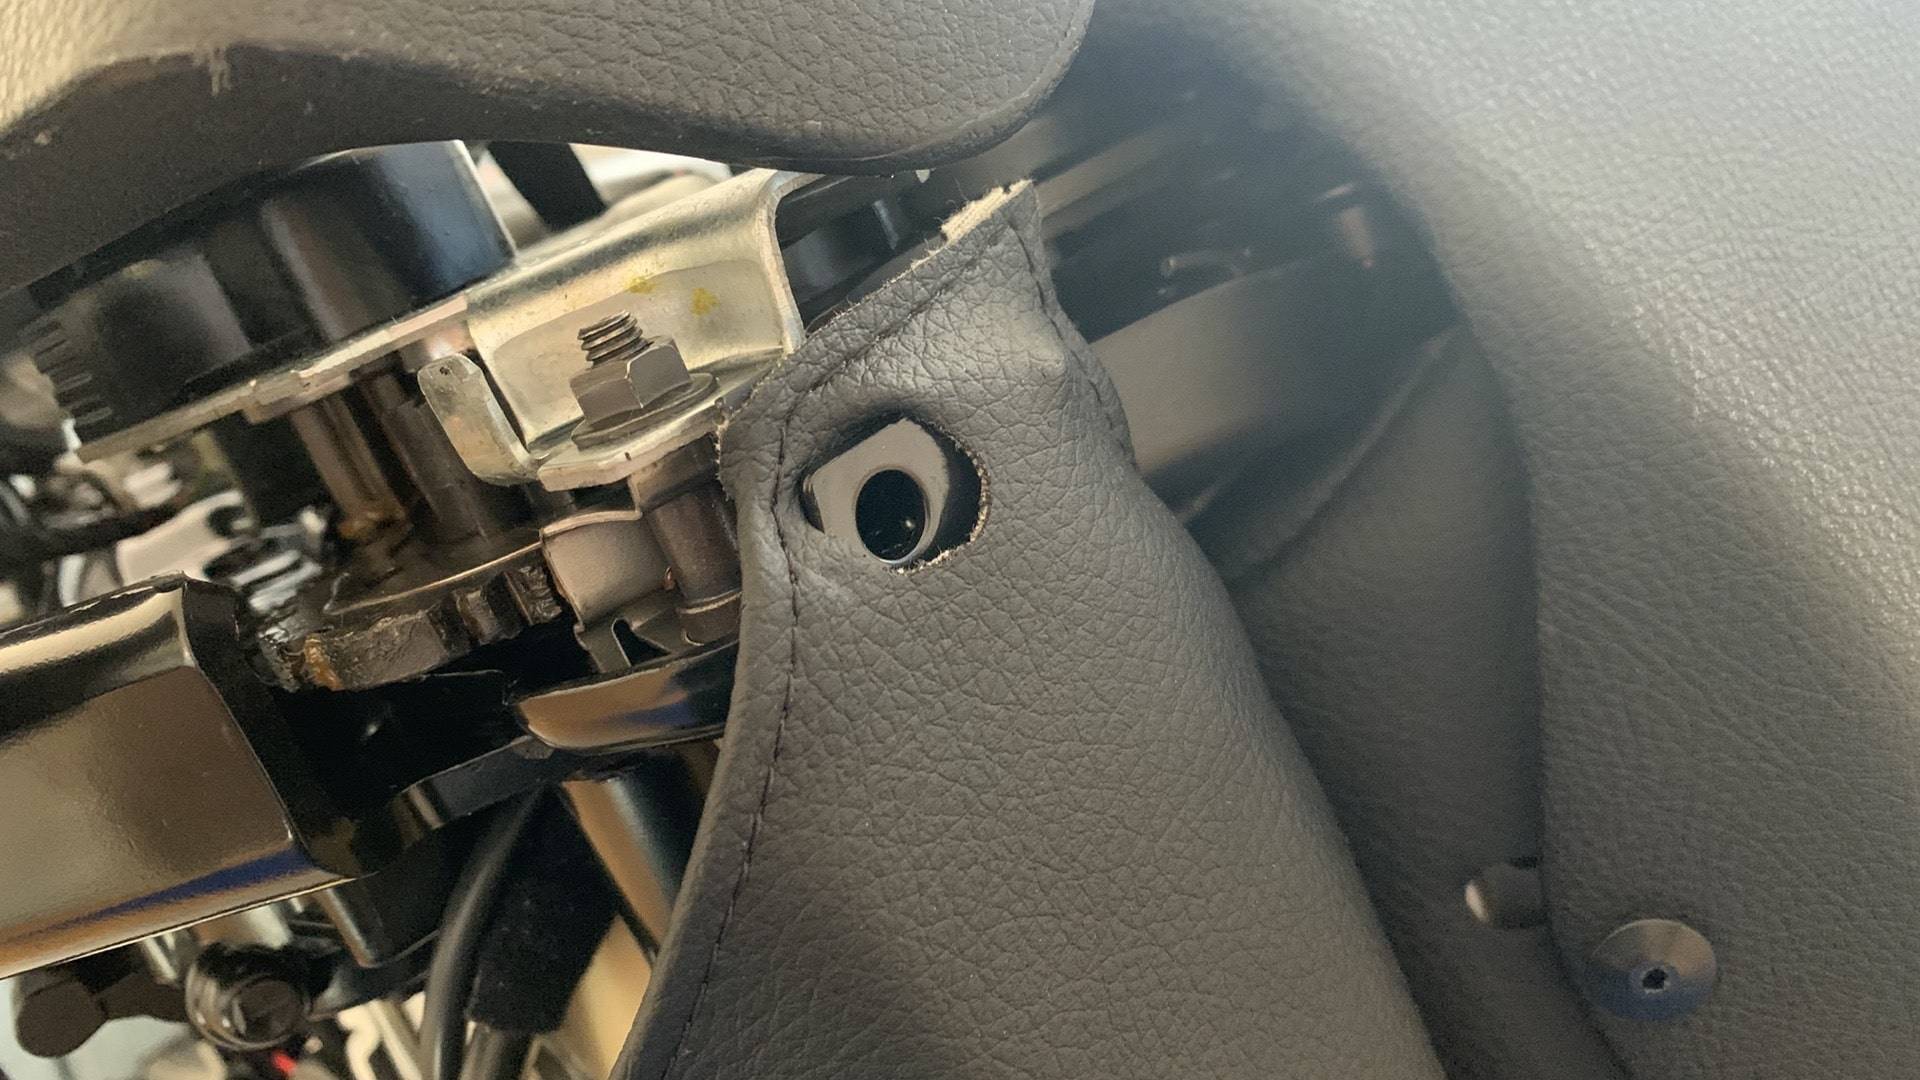
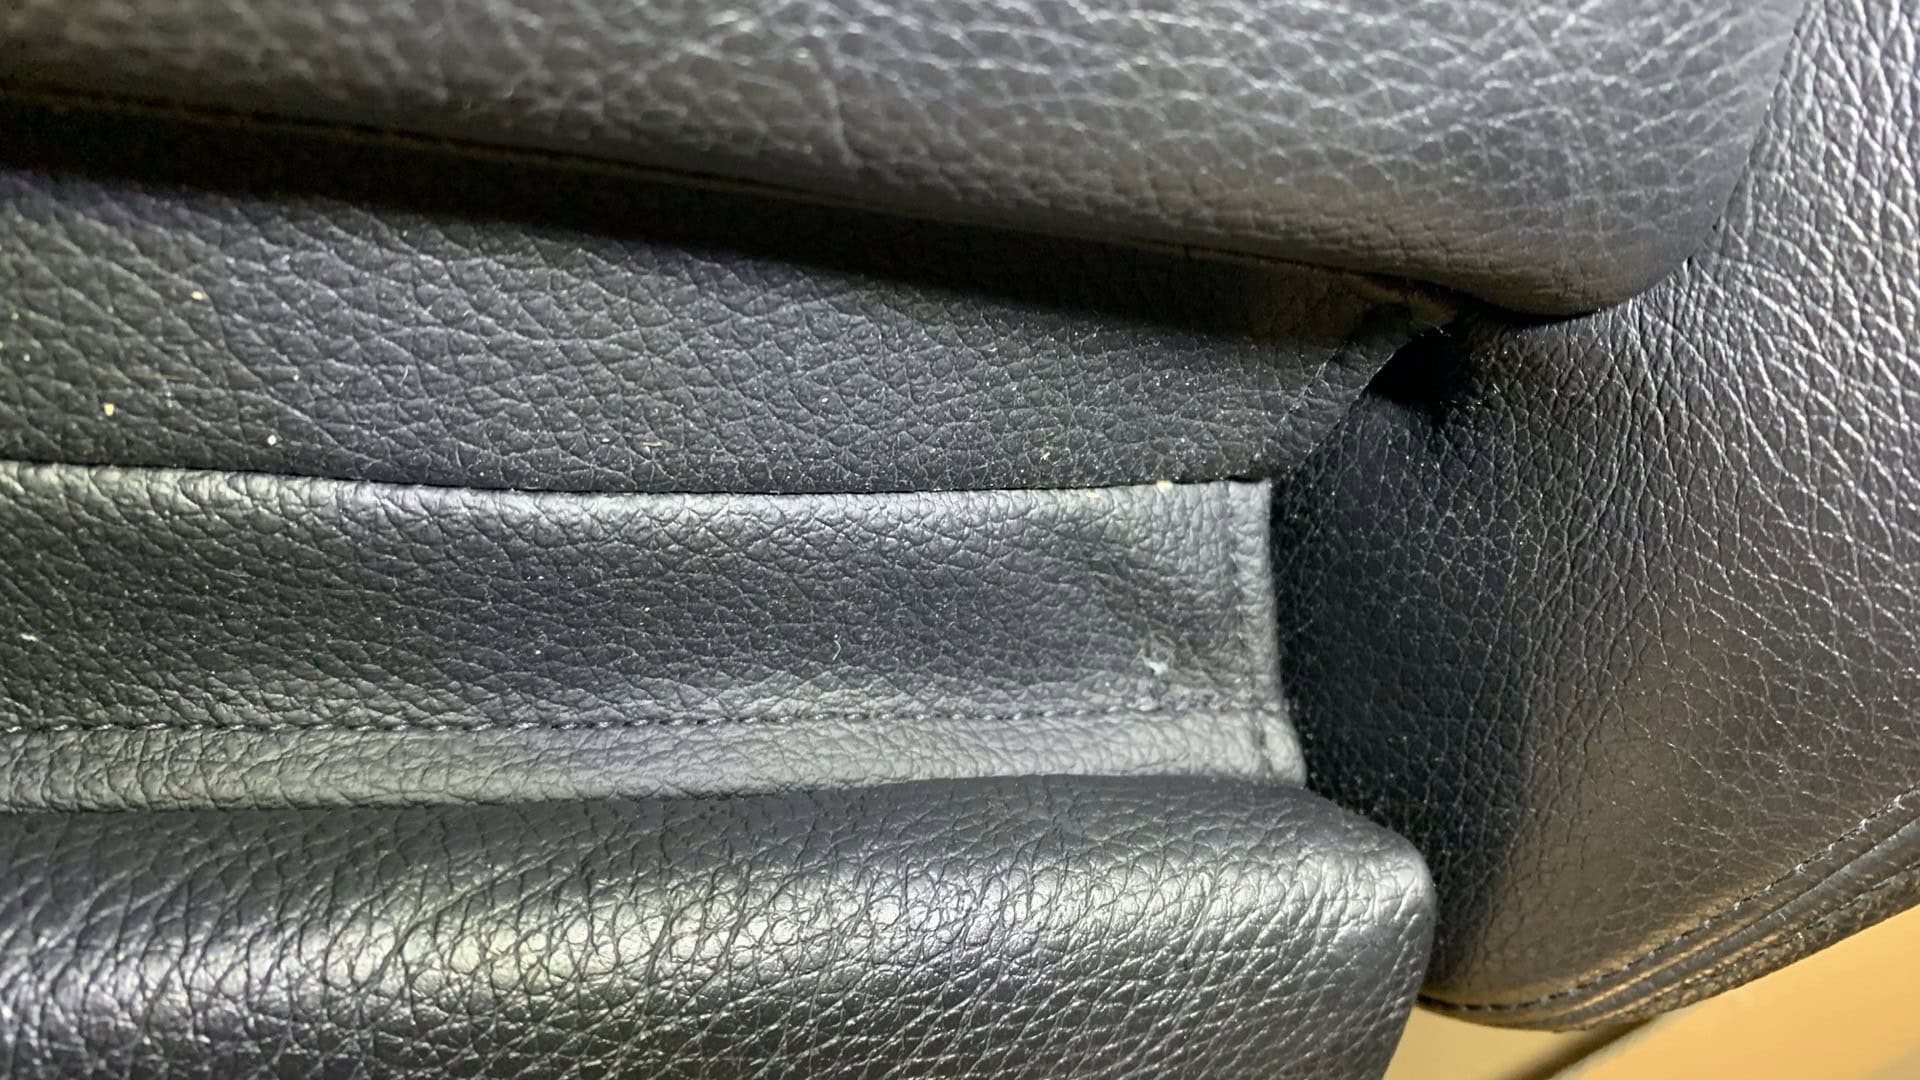
5. Als nächstes müssen Sie die Seitenabdeckungen entfernen - wo der Sicherheitsgurt sitzt - Sie benötigen einen T27, um eine Schraube zu lösen, die dieses Teil festhält, und dann heben Sie es einfach ein wenig an und schieben es nach hinten, es wird herausspringen. Um Ihnen das Leben leichter zu machen, können Sie auch den Gurtstraffer entfernen, aber das ist nicht notwendig.
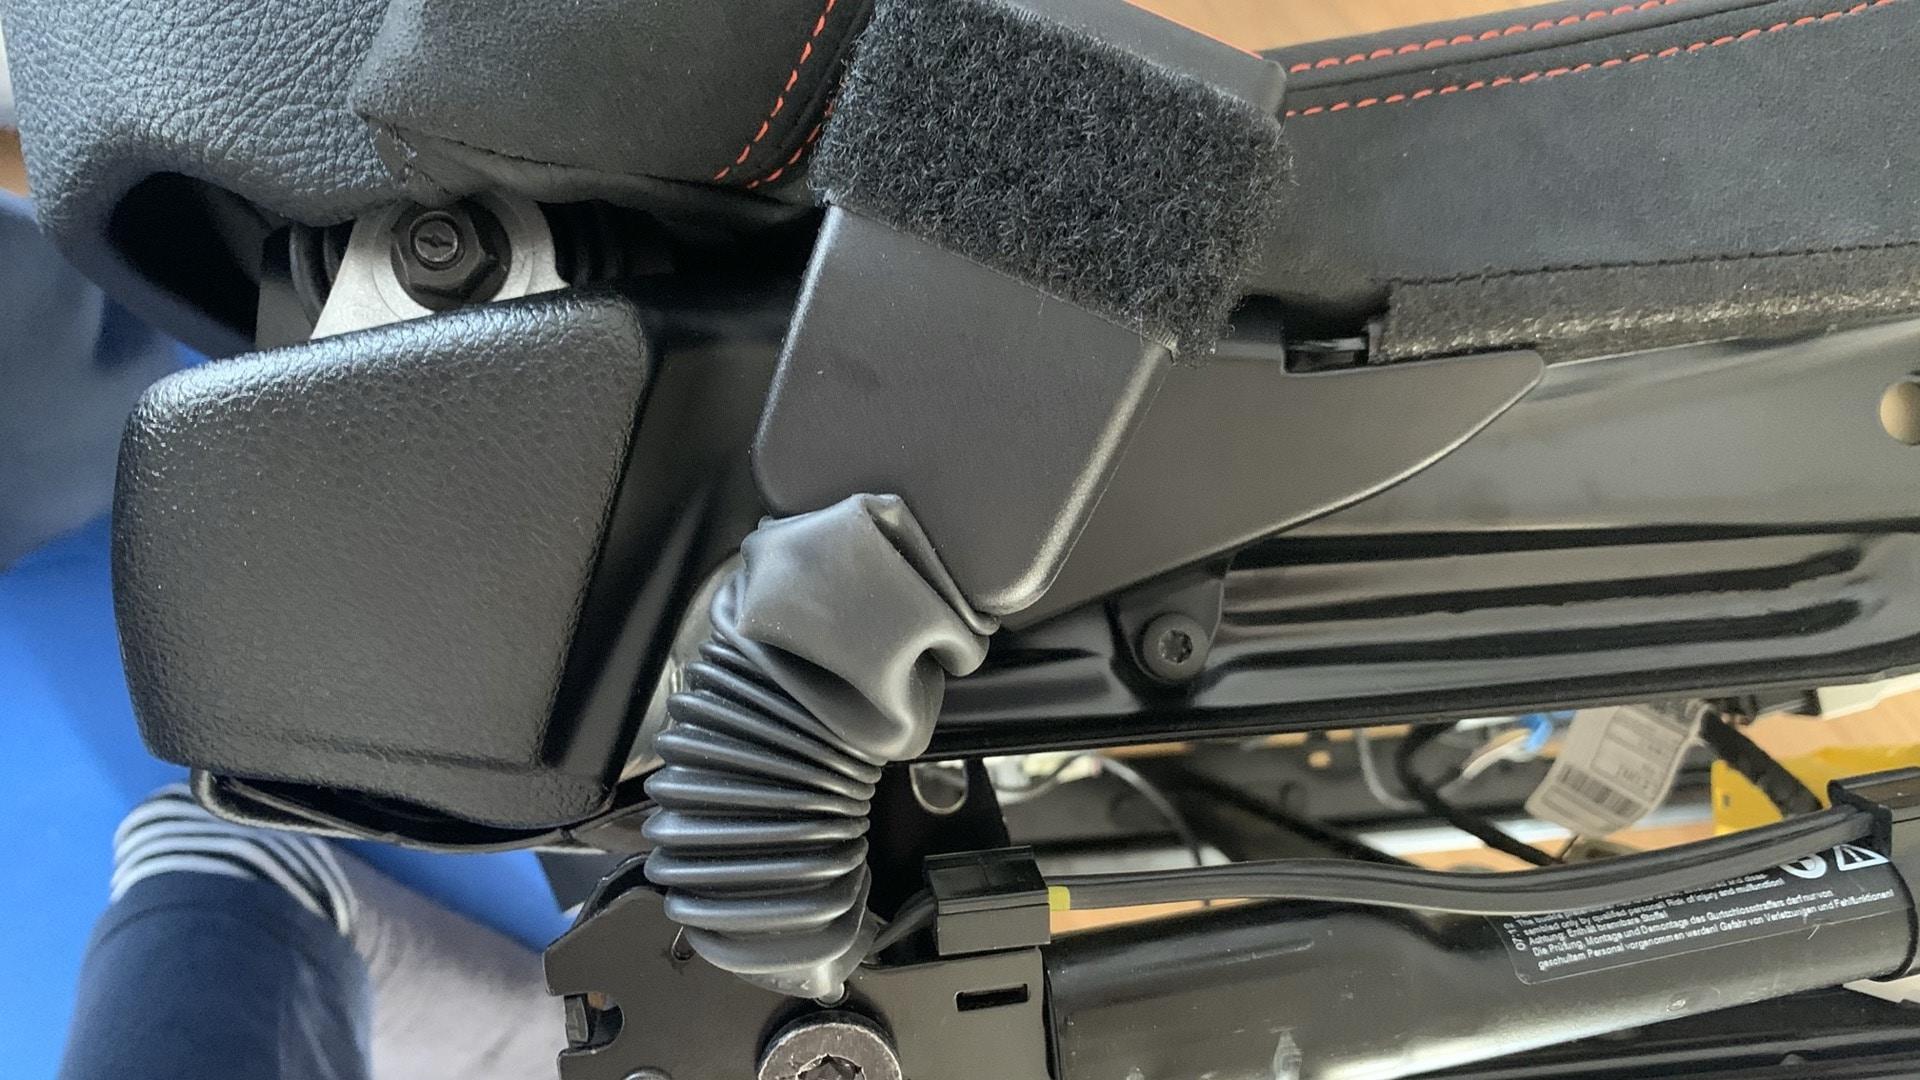
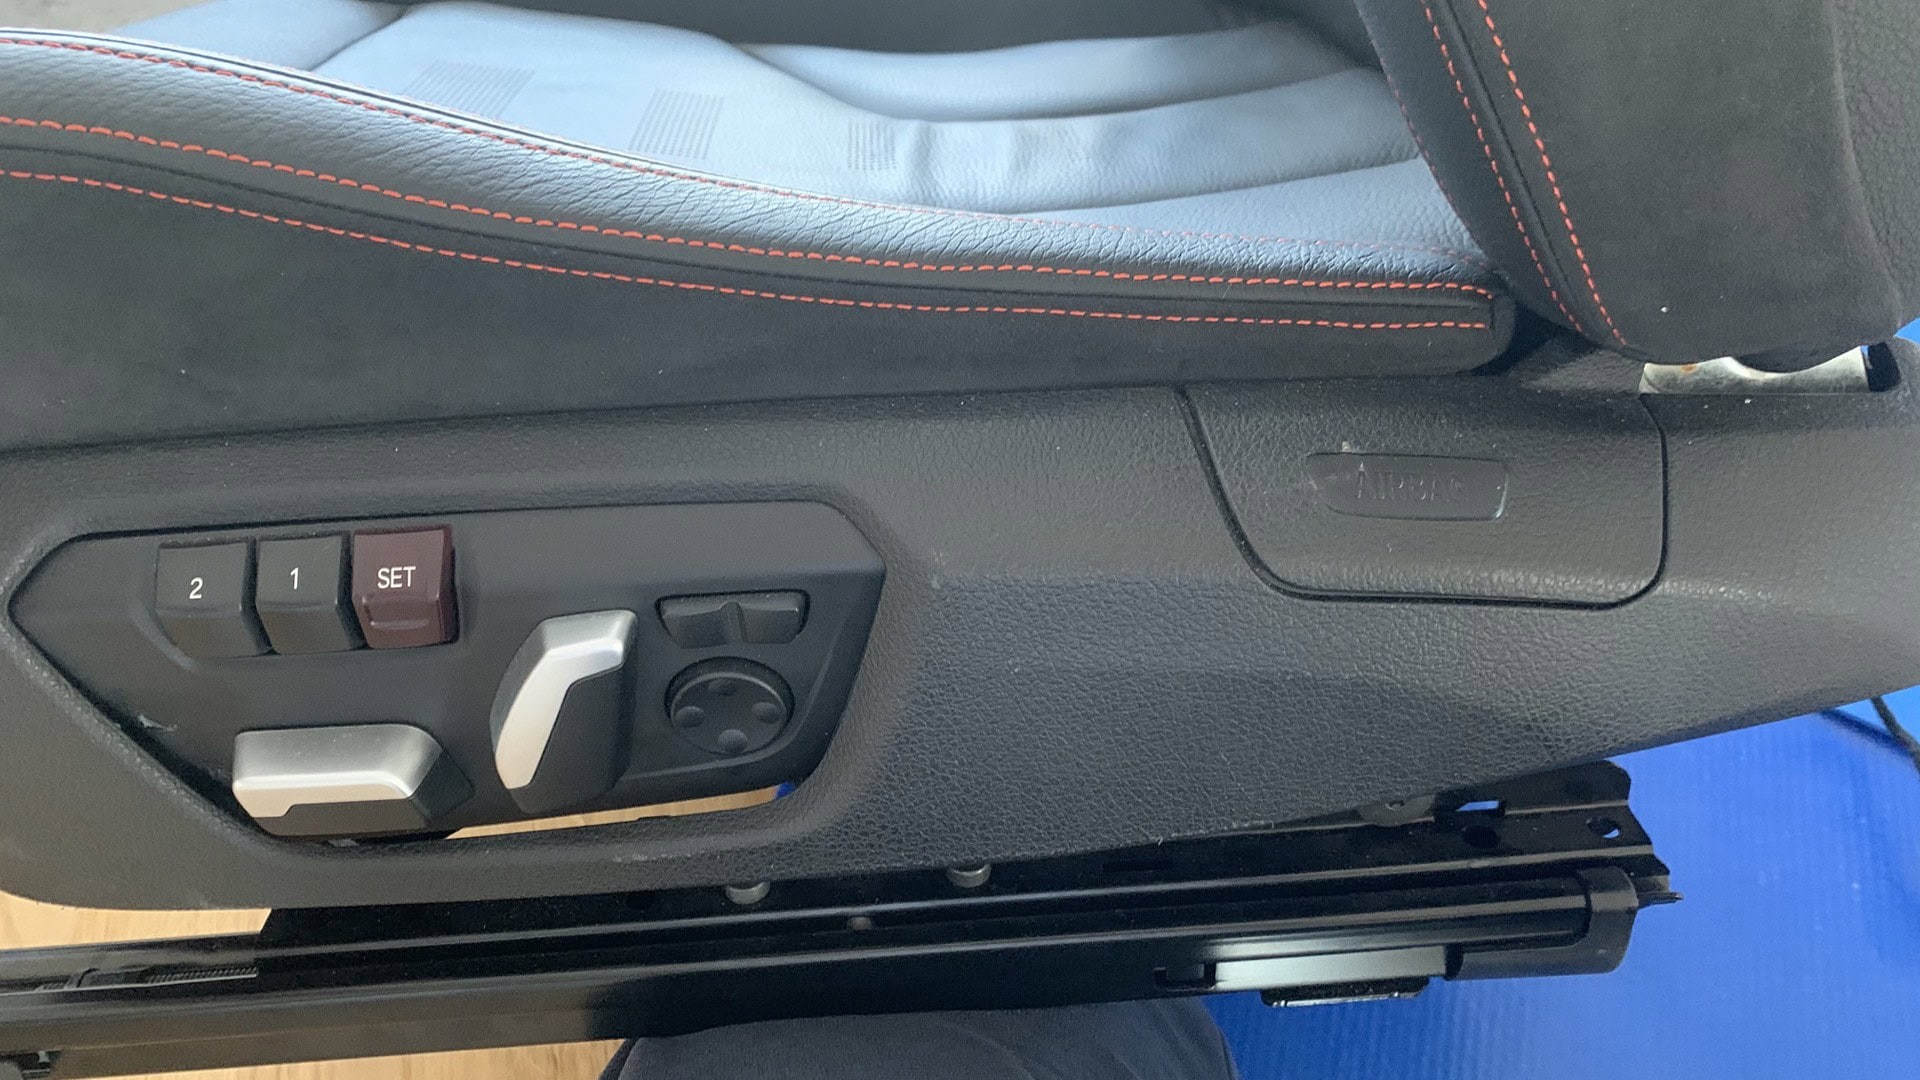
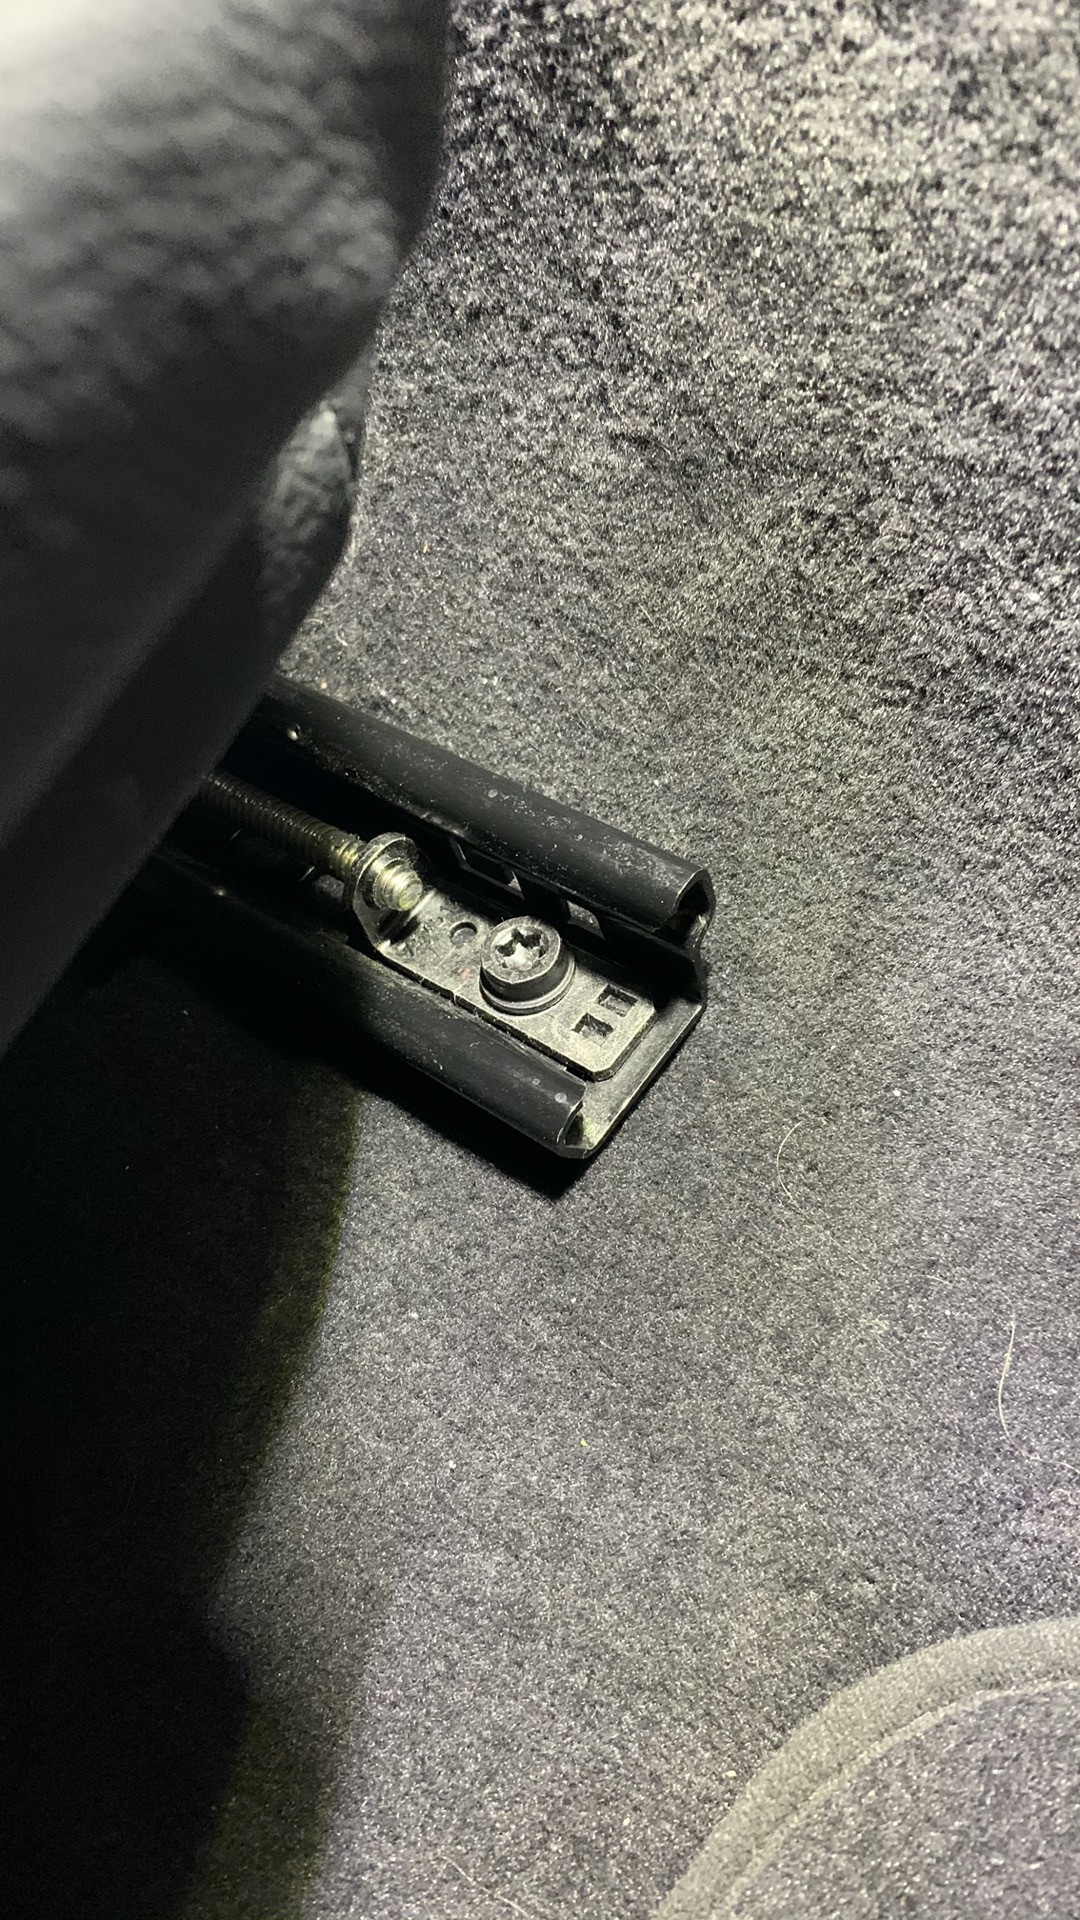
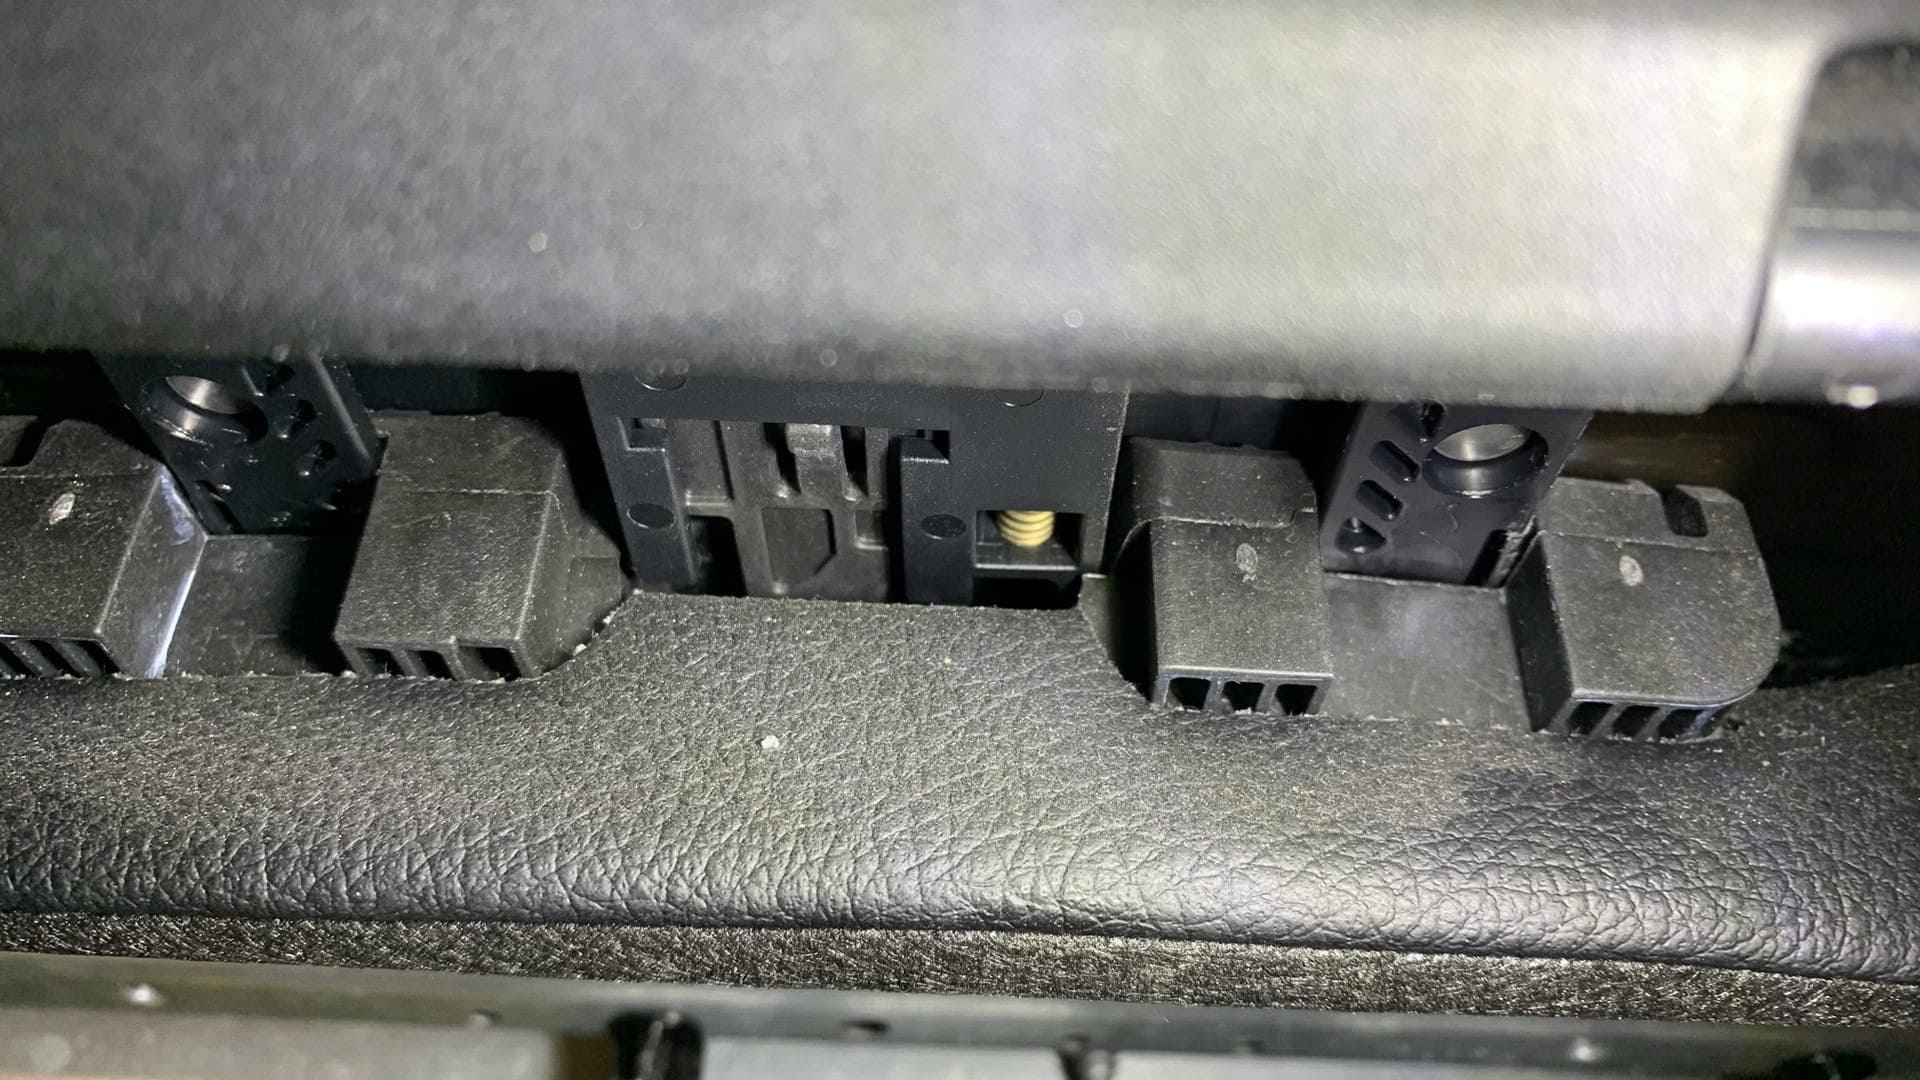
6. Gehen Sie dann auf die gegenüberliegende Seite, wo sich die Knöpfe befinden, mit denen der Sitz bewegt wird. Dort befindet sich eine Schraube, die ihn festhält. T25 - schrauben Sie es ab und legen Sie es zur Seite. Als nächstes müssen Sie das ganze Teil entfernen. Sie müssen es ein wenig anheben, bis sich die 2 Kunststoffklammern an der Unterseite lösen, und es zu sich hin anheben, indem Sie es "an der Sitzkante drehen". Im Grunde genommen müssen Sie den unteren Teil zu sich hin und nach oben bringen und ihn mit beiden Händen festhalten. Hier sind einige Fotos, wie es genau geht. Beginnen Sie von hinten und arbeiten Sie sich nach vorne vor.
7. Sobald Sie das haben, können Sie die Verbindungen trennen (Sie können mehr oder weniger als gezeigt haben), und setzen Sie es auf die Seite, oder lassen Sie es hängen.. vielleicht wickeln Sie es mit einigen schützenden Sache, um es sicher vor Kratzern zu halten. Da Sie den Sitz ein wenig bewegen werden.

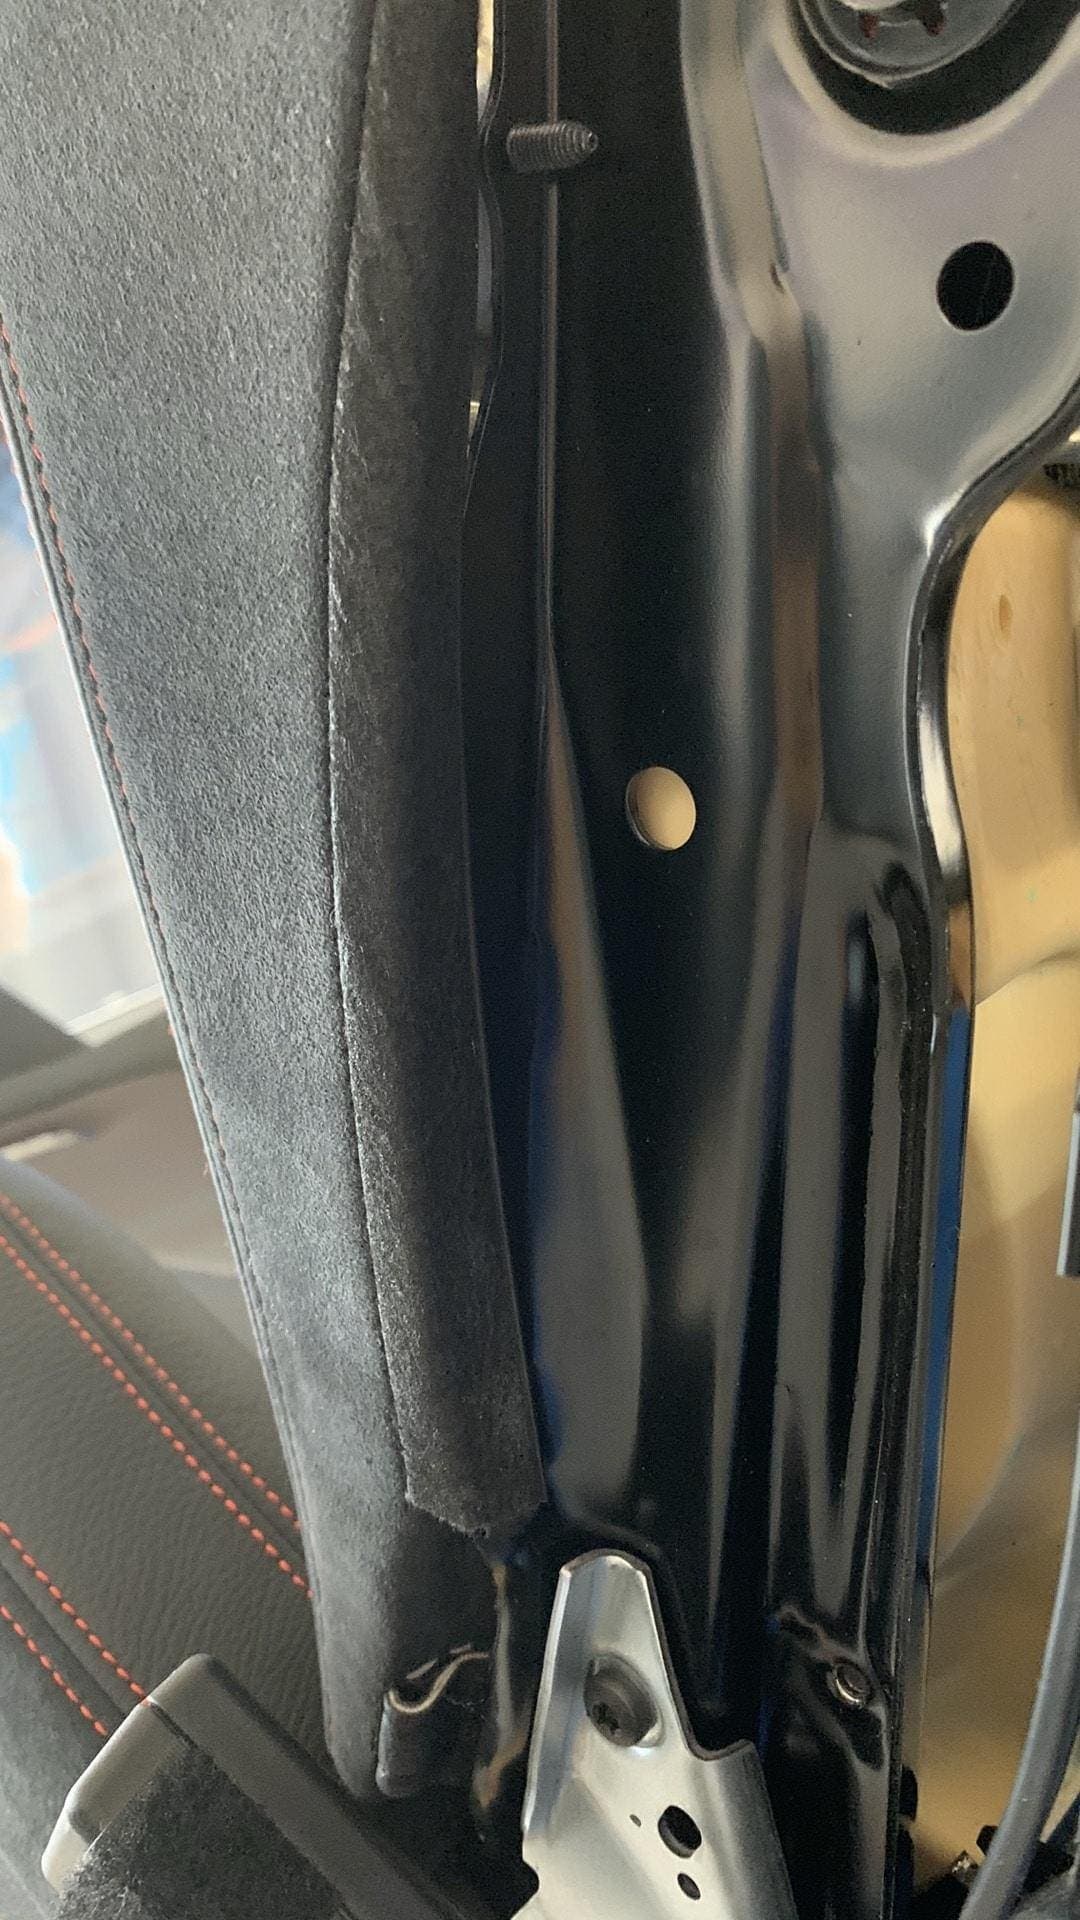
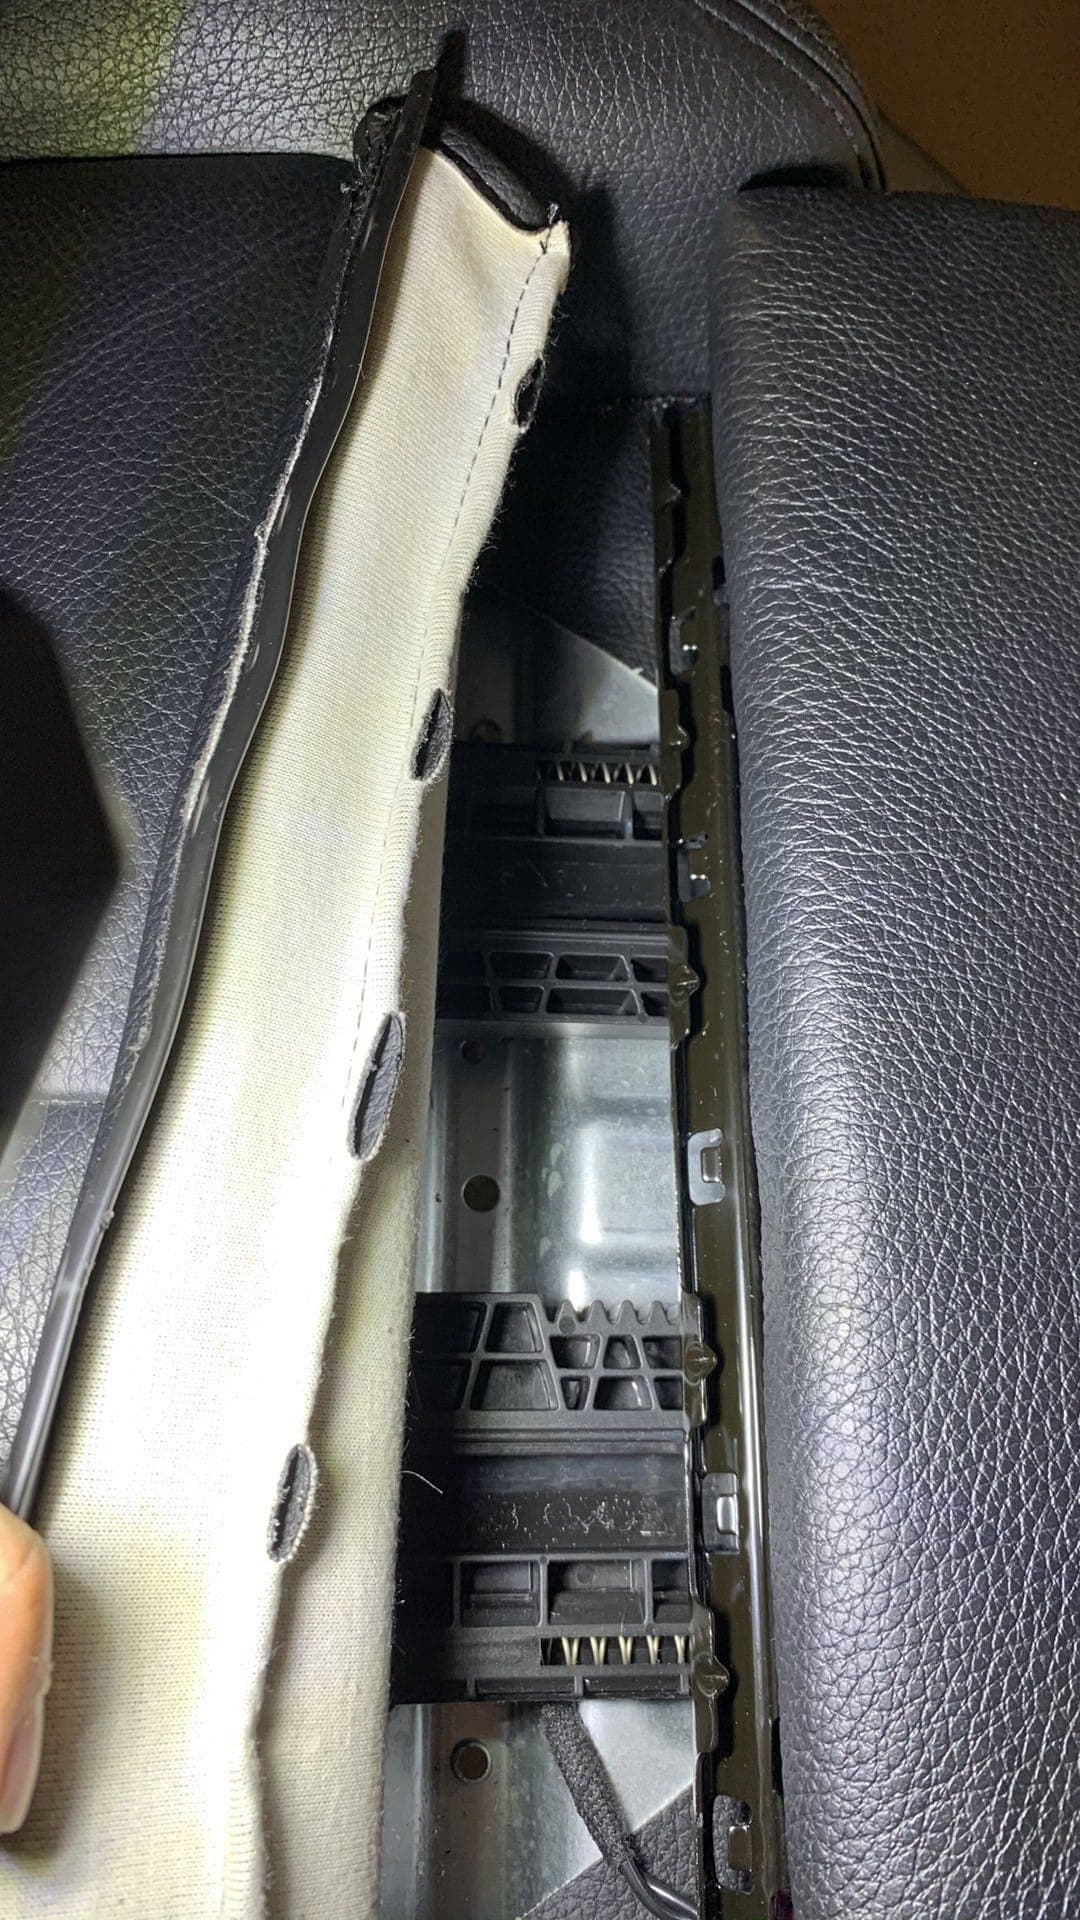
8. Als Nächstes suchen Sie nach zwei kleinen Klammern, die die Unterseite des Sitzbezugs am unteren Rahmen halten, und lösen Sie sie. Am einfachsten ist es, wenn Sie das Leder ein wenig in Richtung der Klemme ziehen und die Klemmen lösen.

9. Sie sind fast am Ziel. Sie müssen noch einen Stecker abziehen - die Beifahrerbelegung - (im Falle des Beifahrersitzes) und ihn von den Klemmen und Kabelbindern lösen.

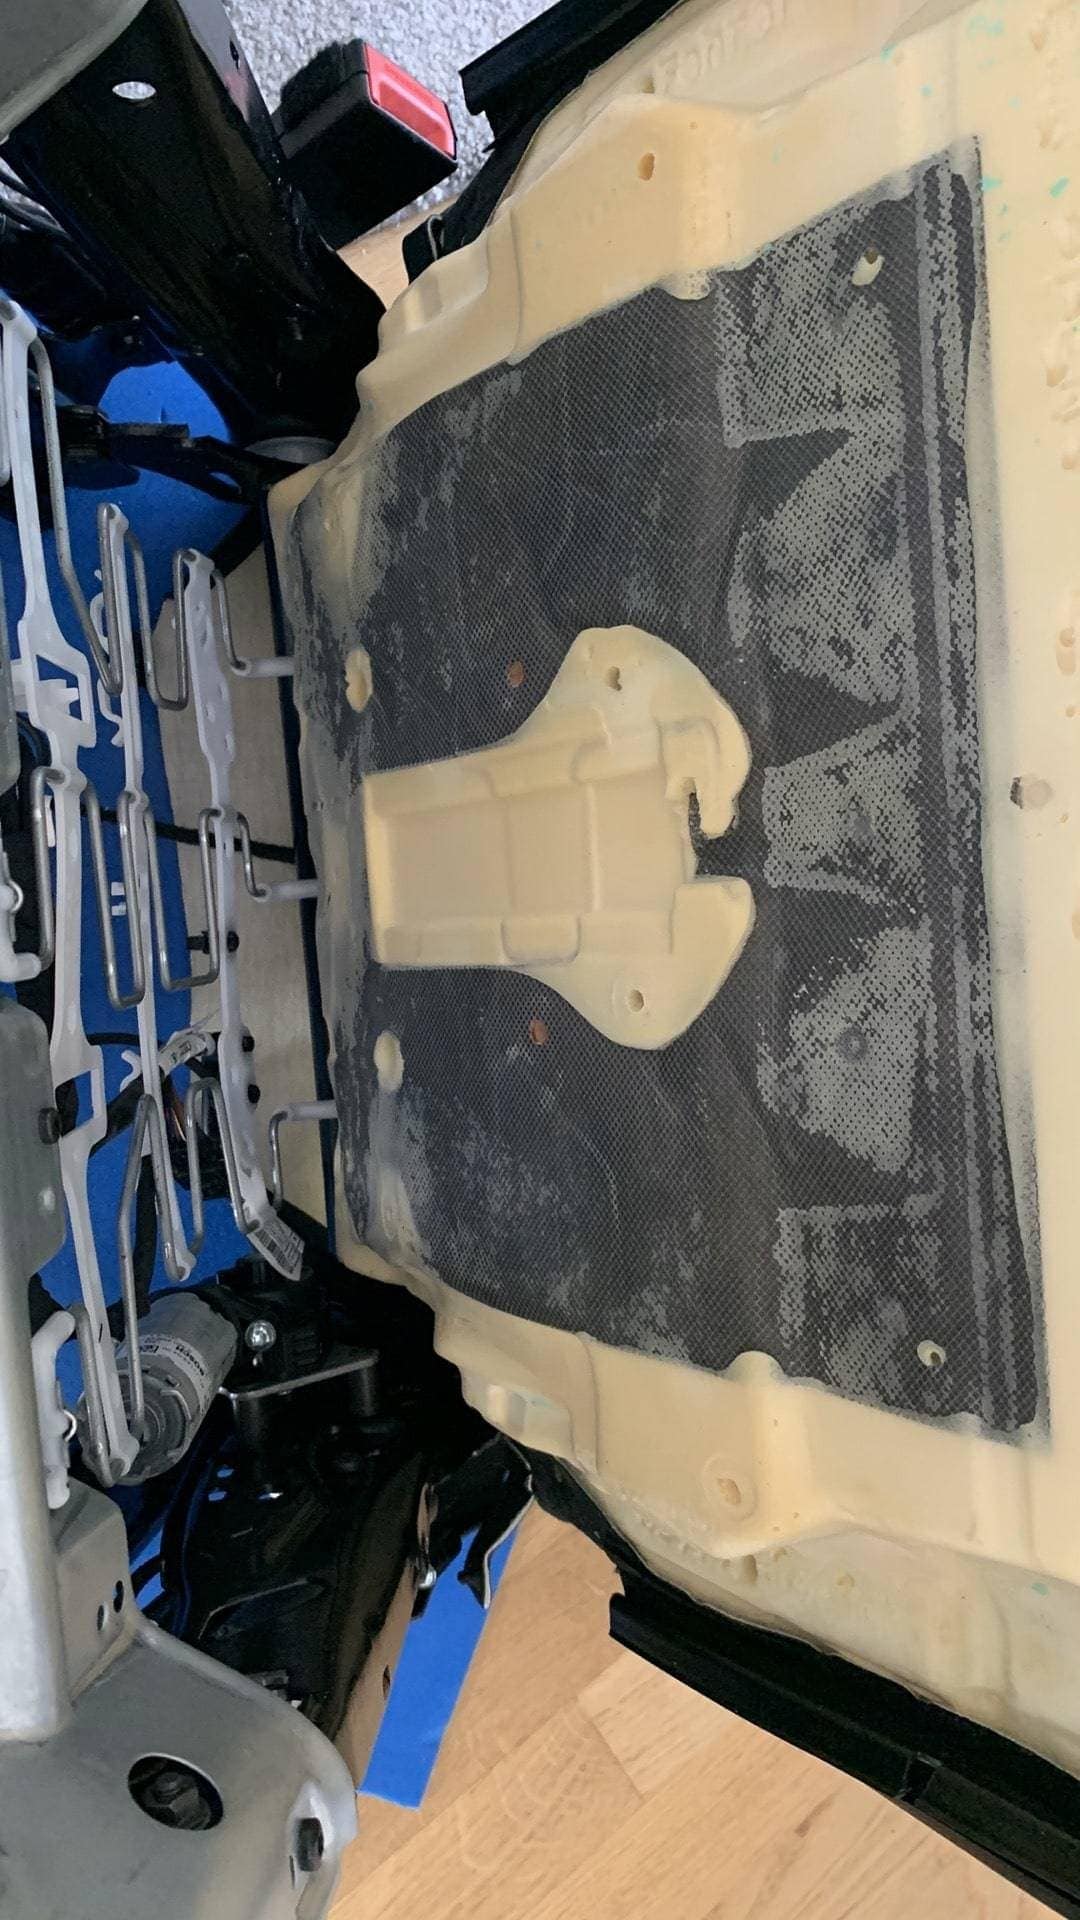
10. Der letzte Schritt besteht darin, den Sitzbezug selbst zu entfernen. Entfernen Sie einfach den Sitzbezug vom Sitz, indem Sie ihn von der Rückseite her vom unteren Rahmen abheben. Beginnen Sie auf einer Seite, arbeiten Sie sich zur Mitte hin vor, gehen Sie dann zur anderen Seite und machen Sie dasselbe. Nehmen Sie den Sitzbezug ab und legen Sie ihn zur Seite. Nehmen Sie einen Drink. 🍻
Wiederholen Sie den Vorgang auf dem Fahrersitz.
2. So entfernen Sie den Rückenrahmen des M2 Competition Seat (gilt auch für M4)
Was Sie brauchen:
- T40 Schraubendreher
- Aufbrechwerkzeug
- 2x neue Schrauben, BMW Teilenummer: 52108099039
- Lösen Sie die Kabel des oberen Teils vom unteren Rahmen.
2. Entfernen Sie die Abdeckung vom Sitz. An der Unterseite befinden sich 2 Stifte, die den Bezug festhalten. Entfernen Sie diese mit einem Stemmeisen und beginnen Sie, das Leder vom Bezug zu trennen. Beginnen Sie von unten, bewegen Sie einfach die Kante des Leders zu sich hin und drehen Sie es nach außen. Gehen Sie vorsichtig vor, Schritt für Schritt.
(Falls Sie einen Coupé-Sitz haben, beginnen Sie mit Nummer 4.) Entfernen Sie die Schrauben auf der linken und rechten Seite des Sitzes (T25), benötigt ein wenig Kraft, sie sind mit 32Nm angezogen. Nachdem Sie die Schrauben entfernt haben, werfen Sie sie weg, Sie müssen sie ersetzen.
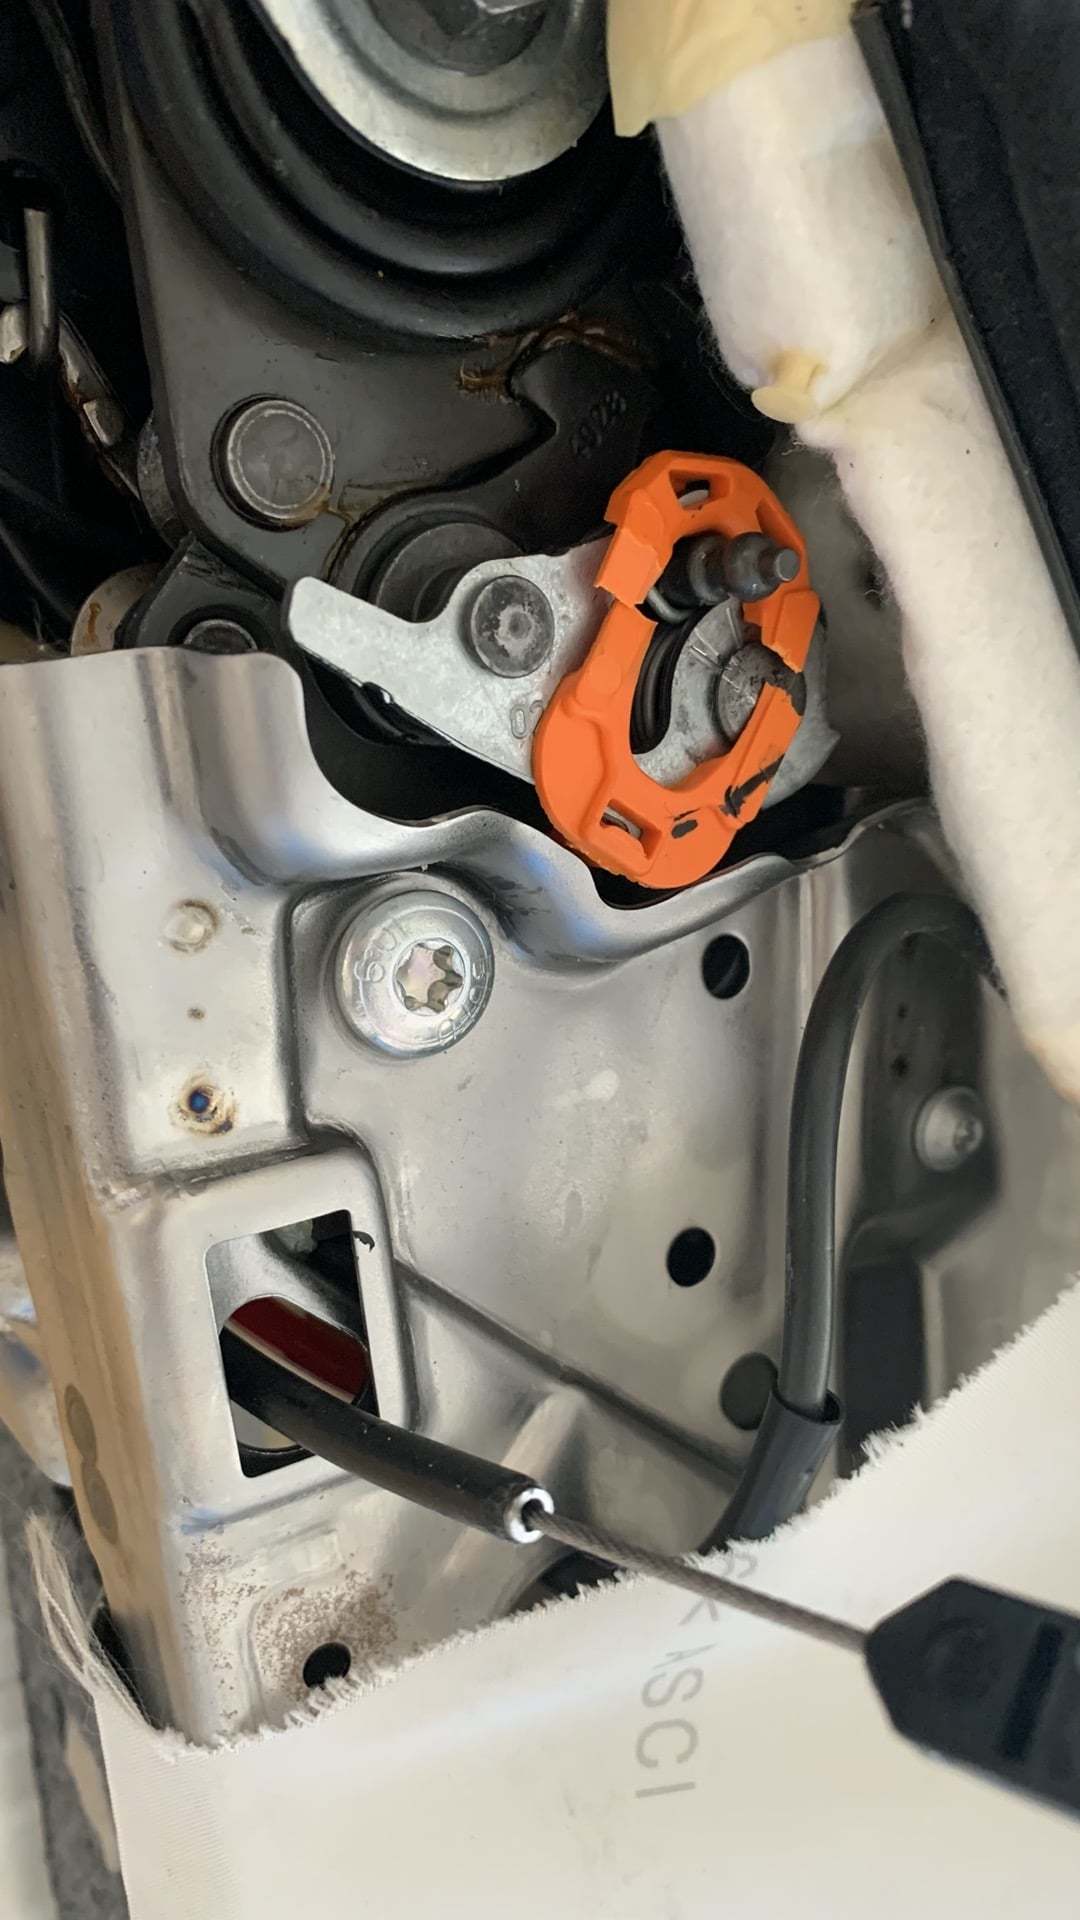
4. Bei einem Coupe-Sitz müssen Sie das Kabel lösen, das es ermöglicht, den Sitz nach vorne zu bewegen - wenn die Passagiere auf den Rücksitz wollen -, hebeln Sie es einfach mit einem Plastikwerkzeug ab und entfernen Sie das kleine Plastikteil.
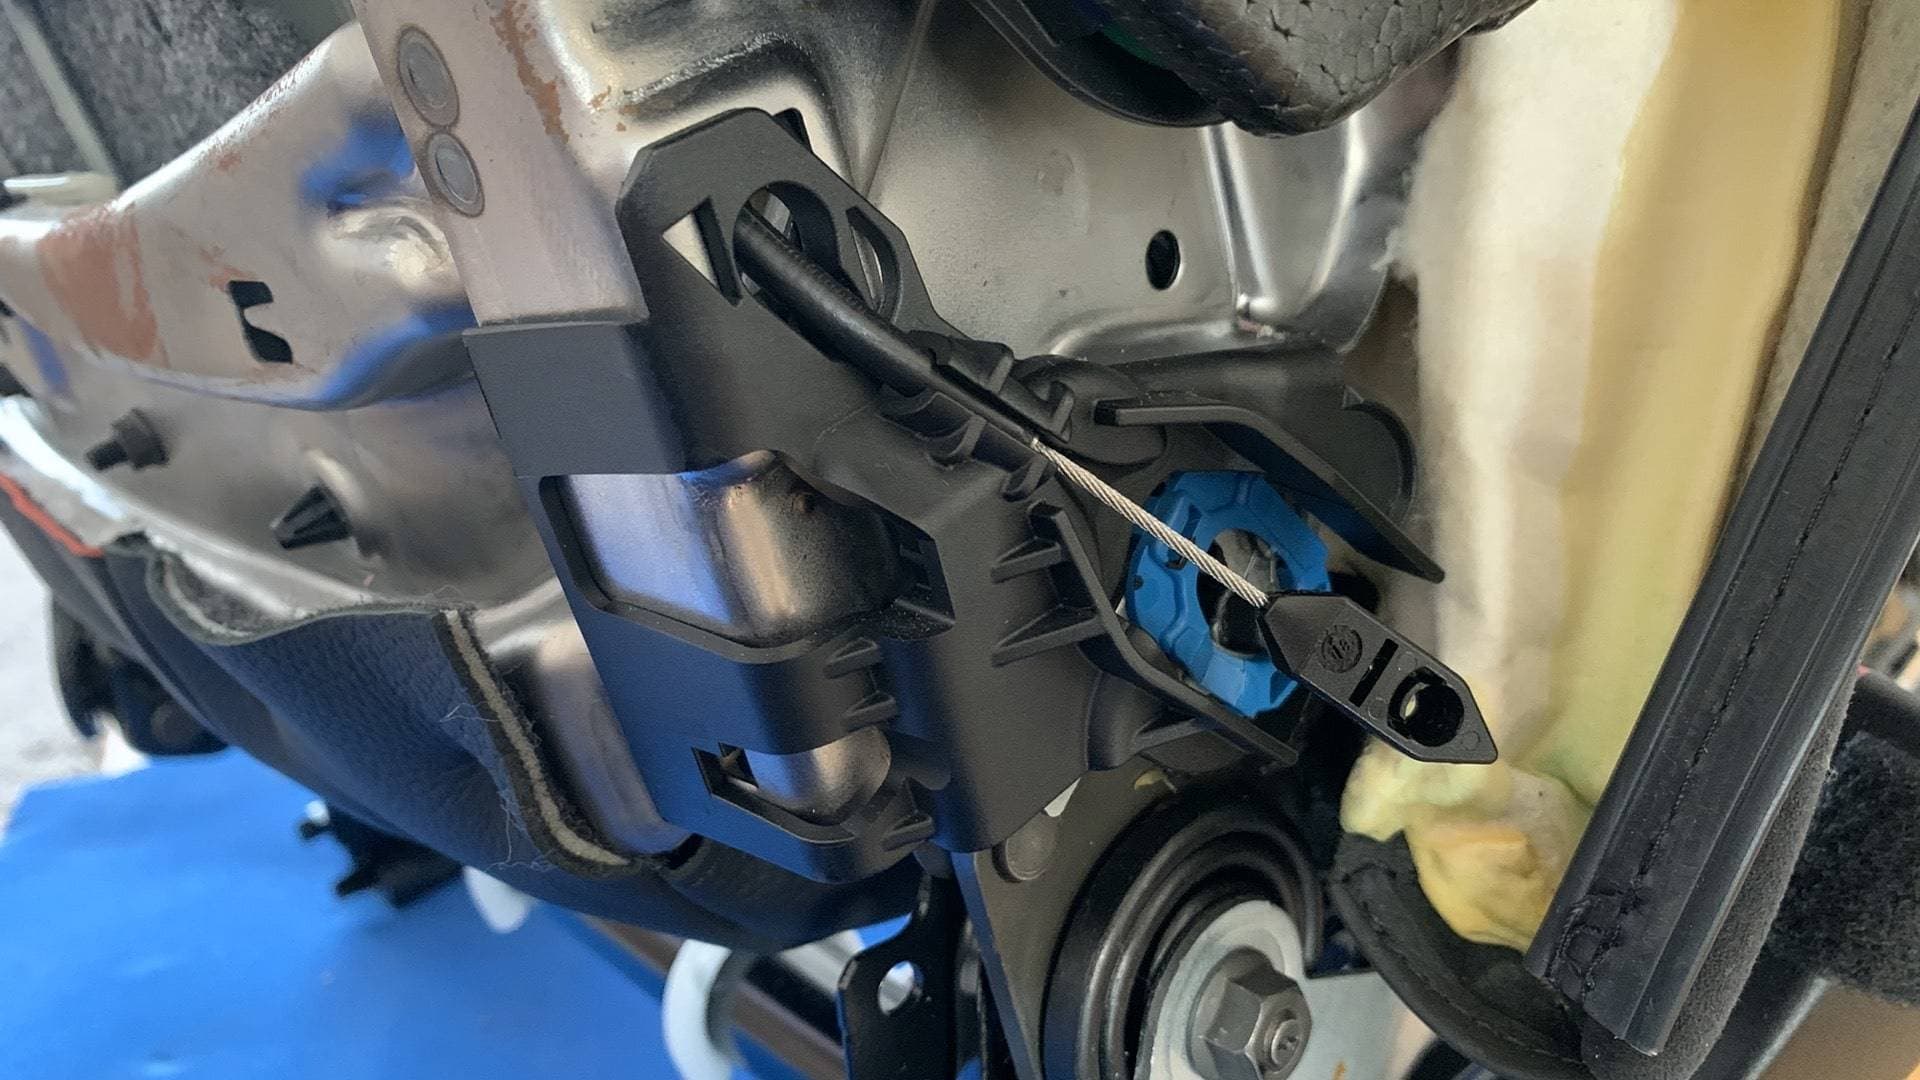
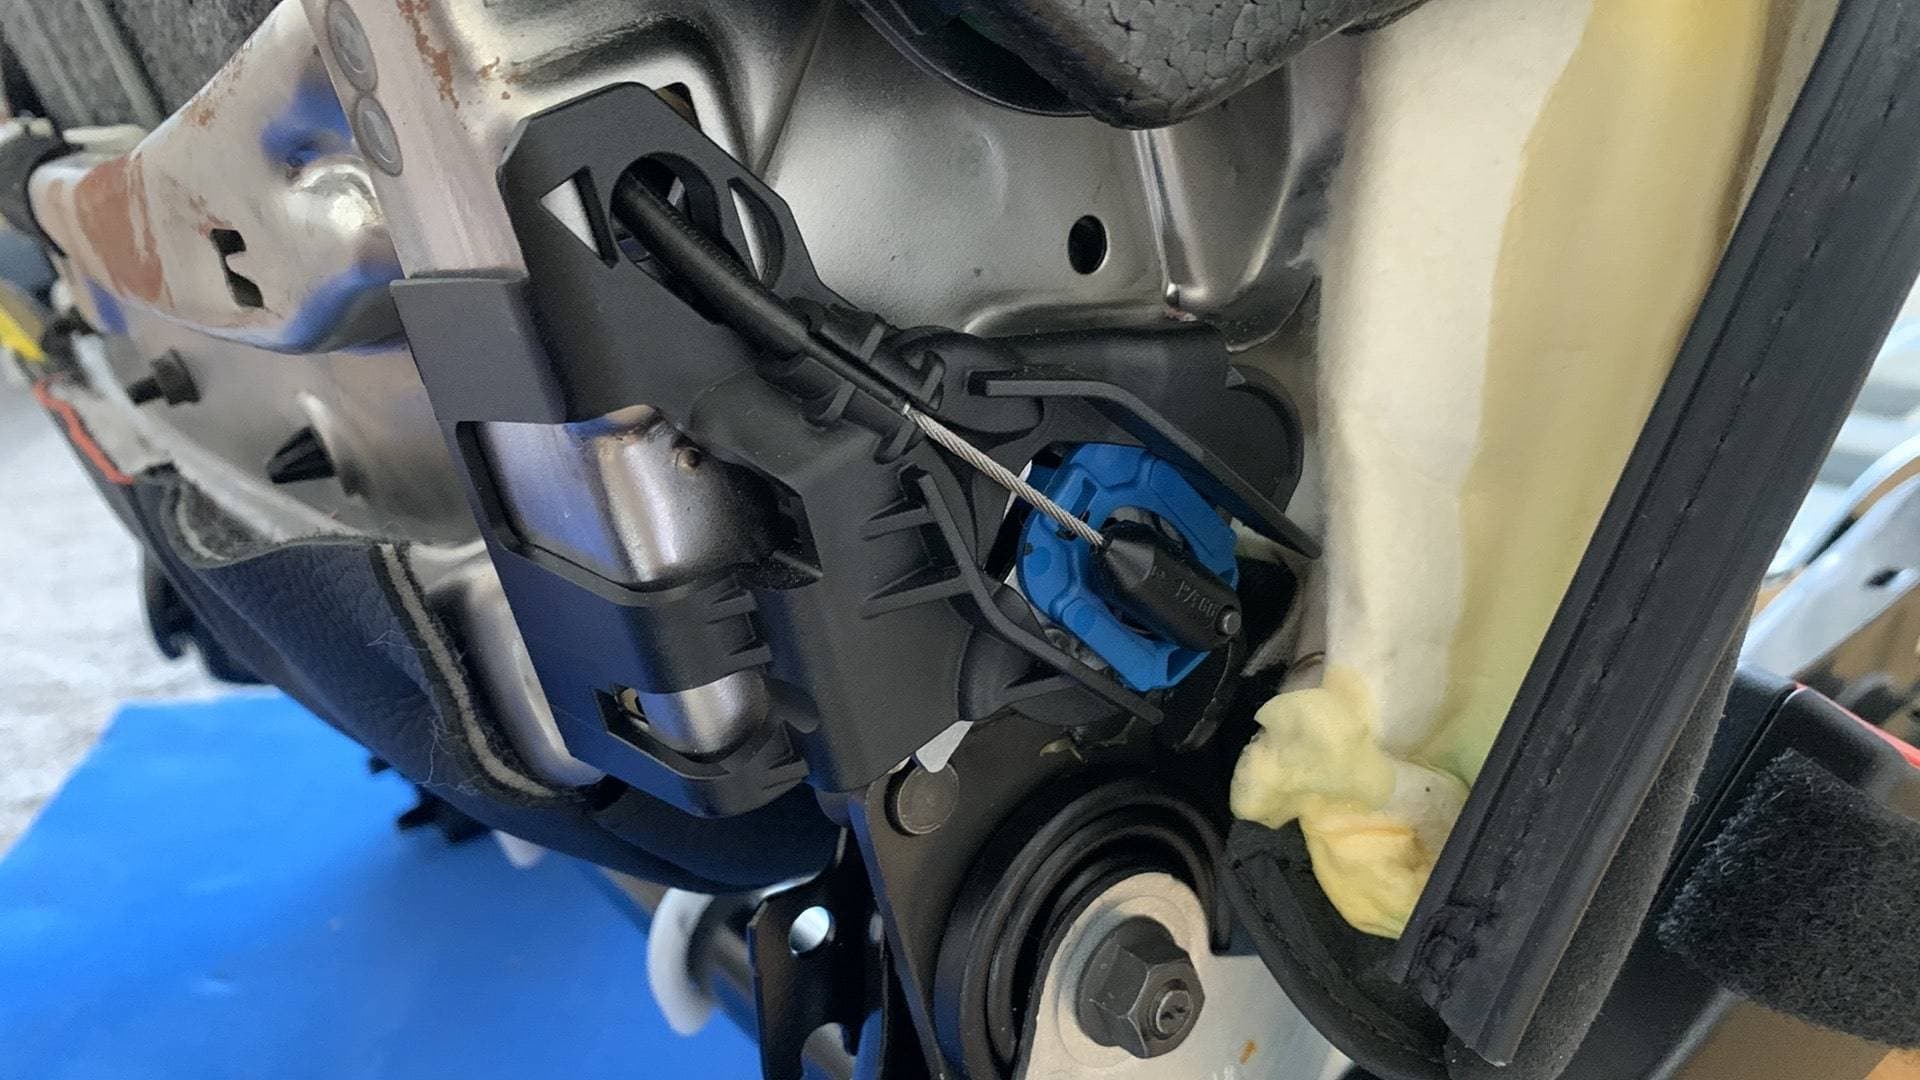
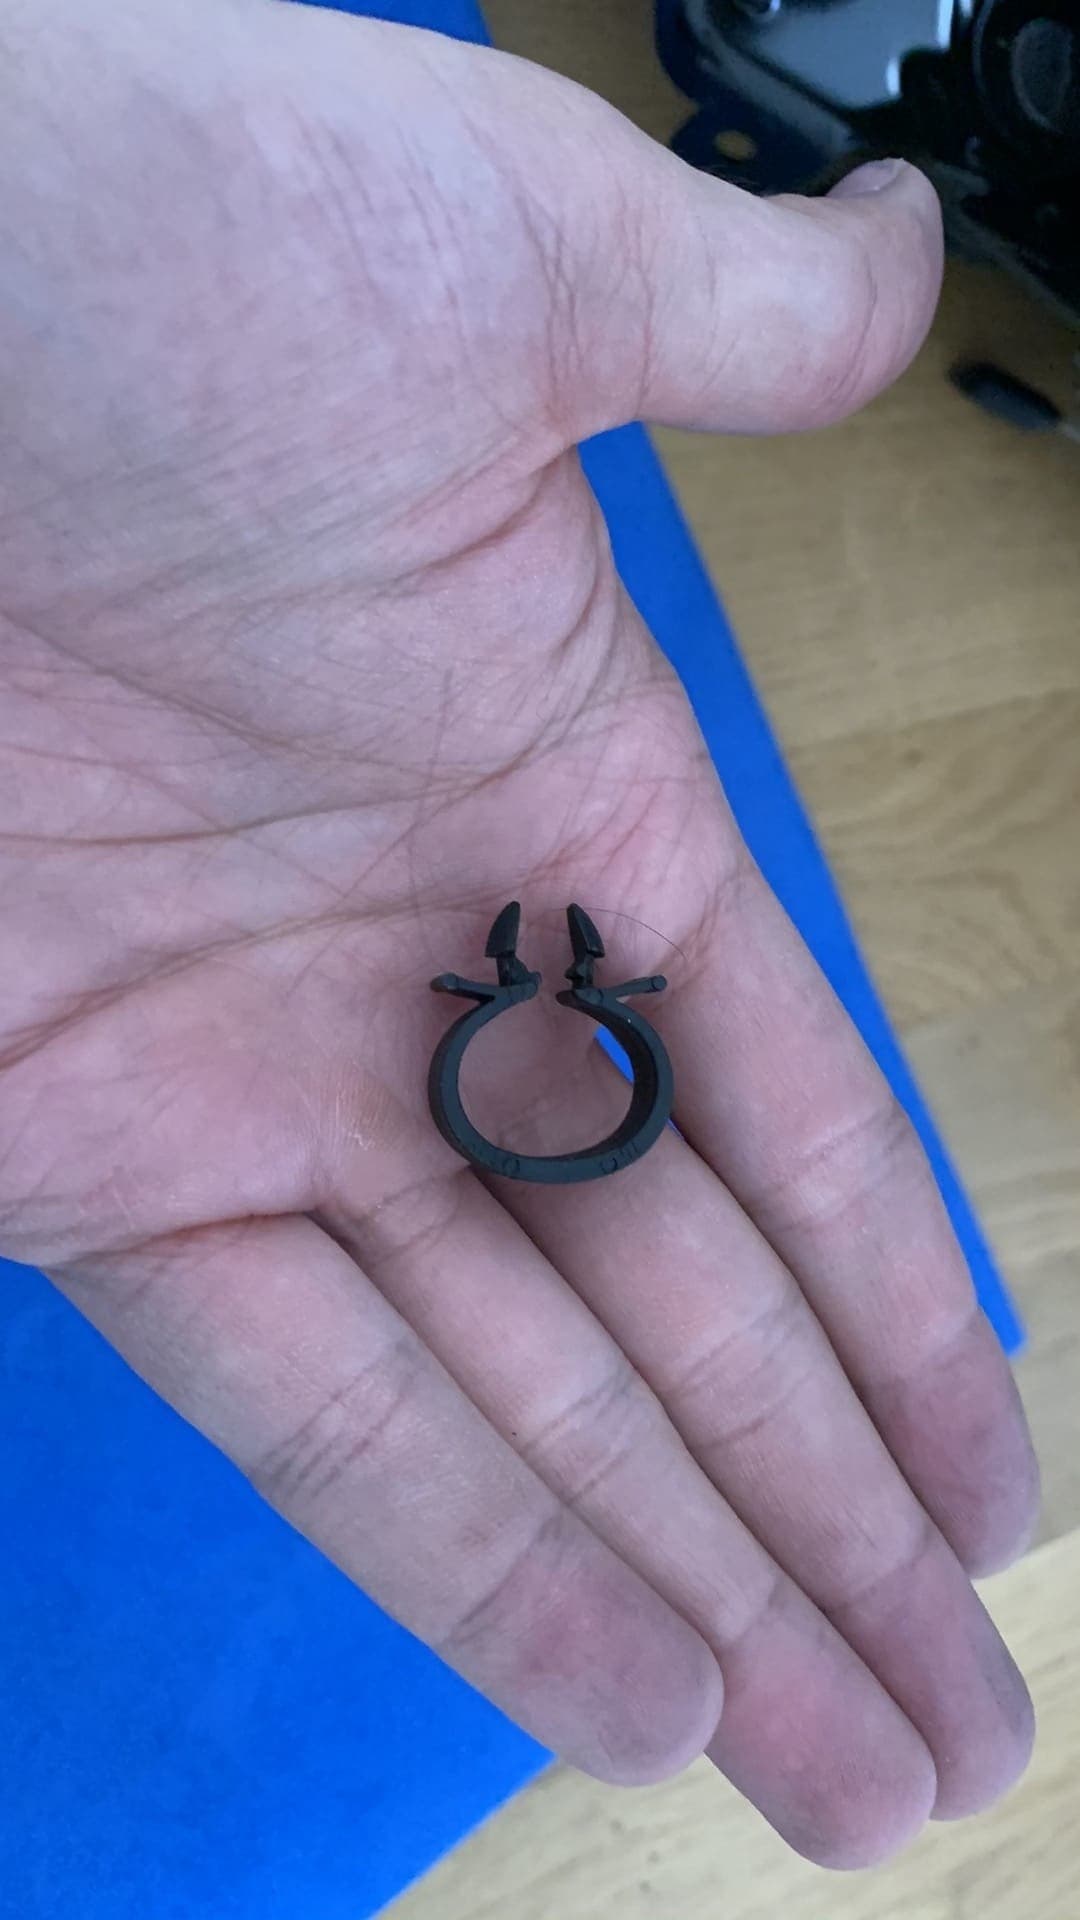
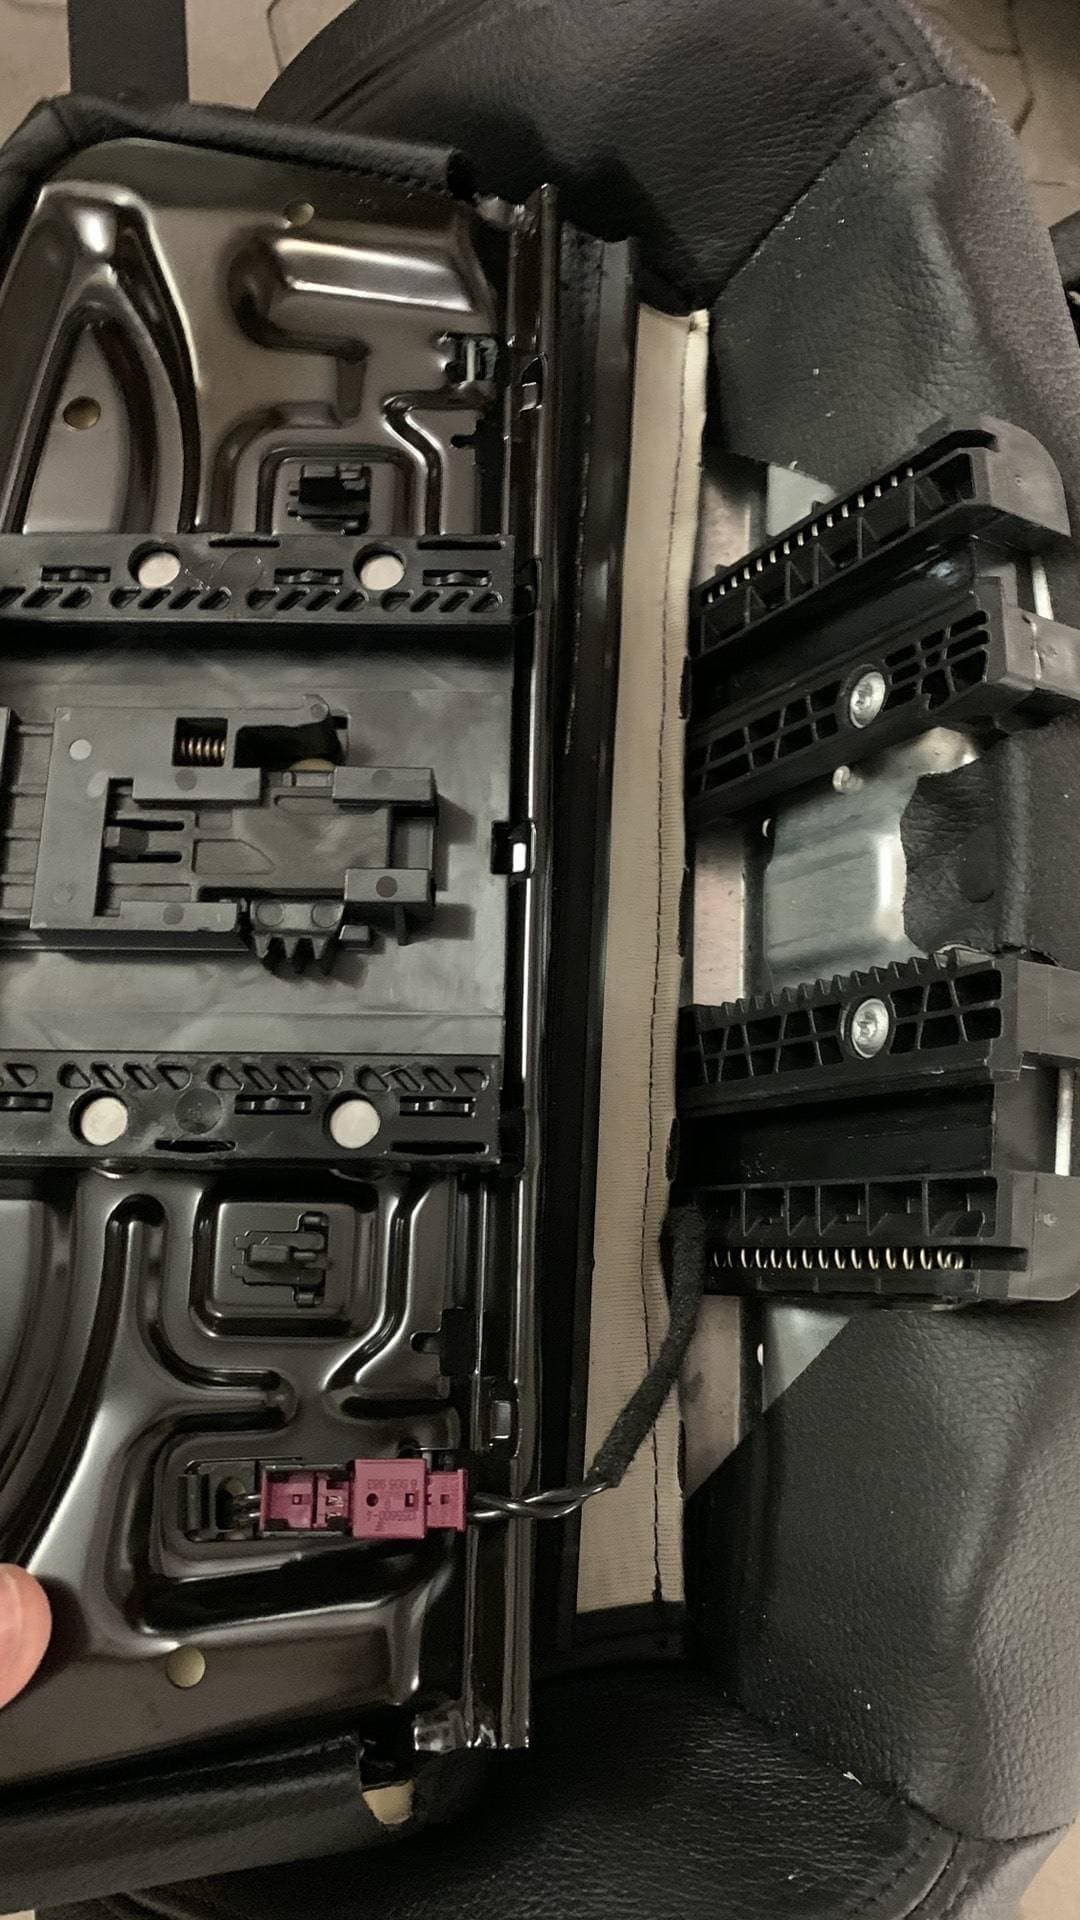
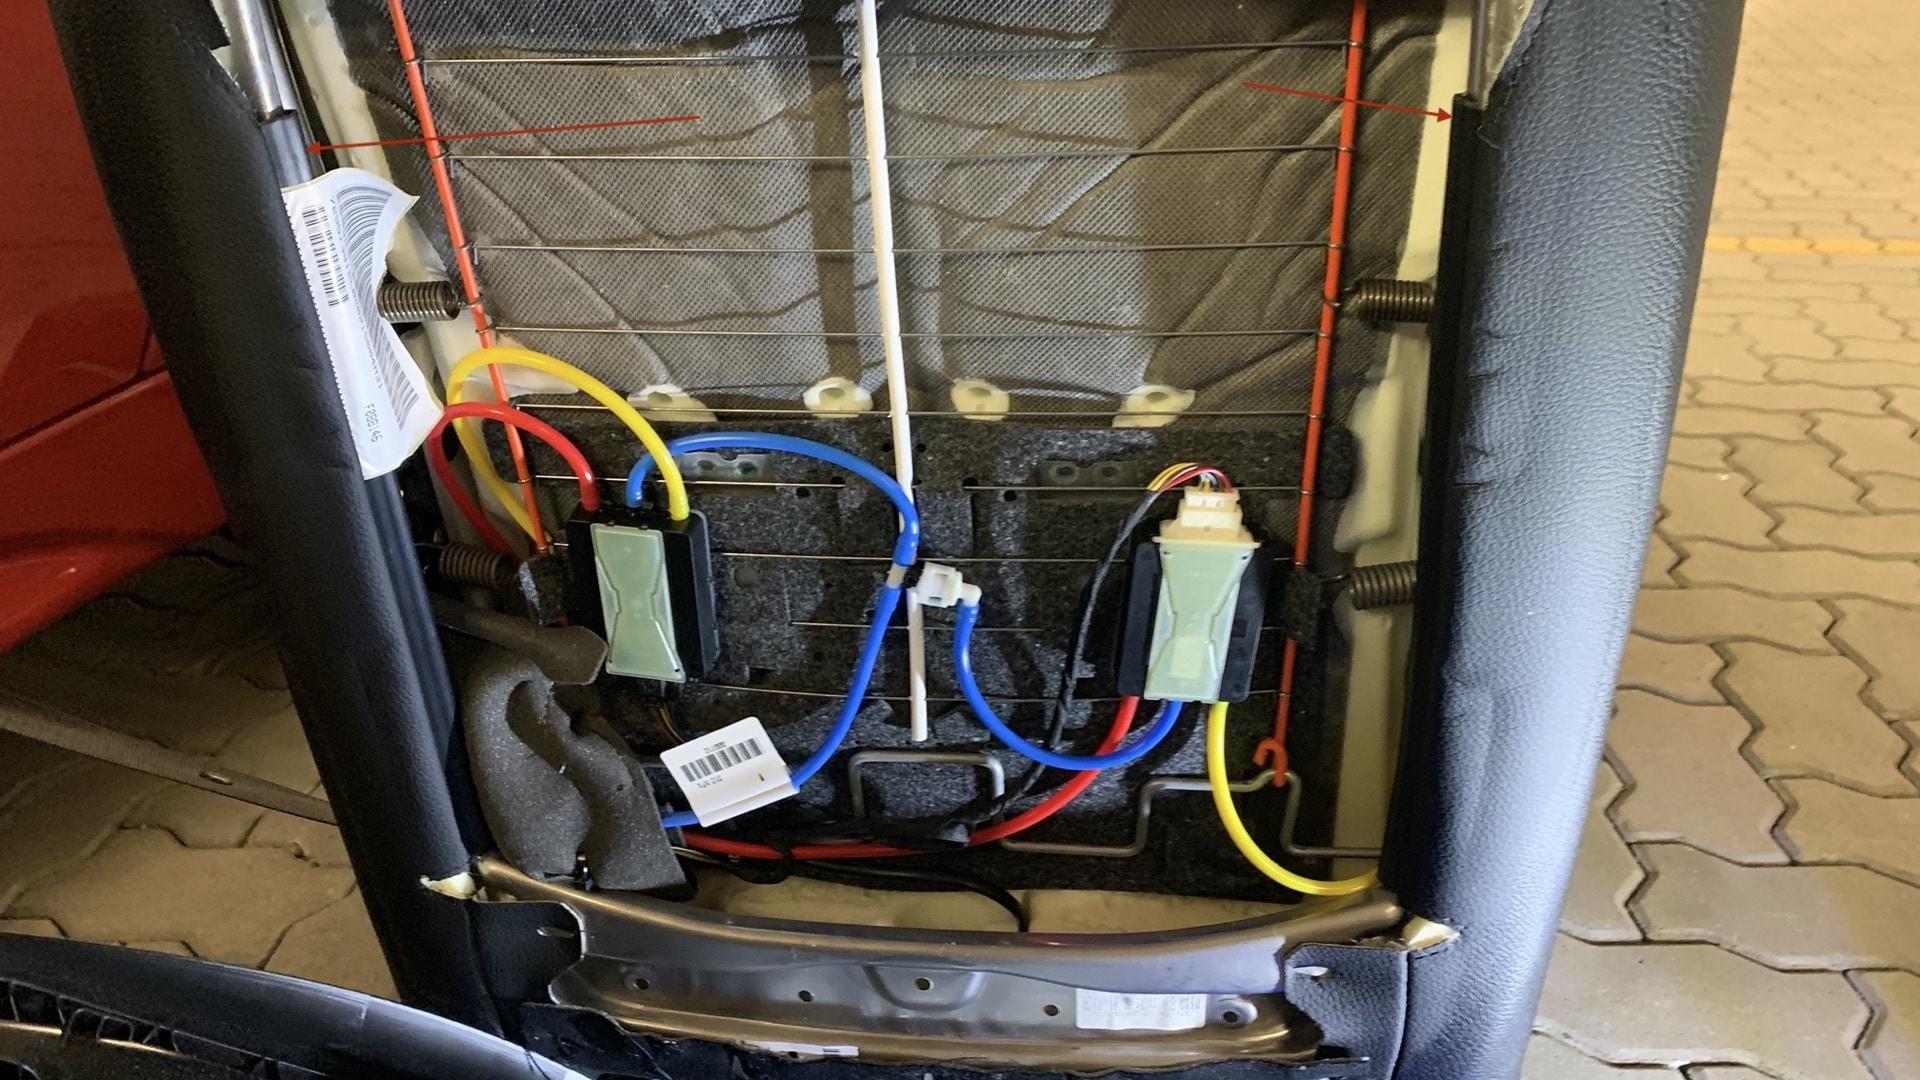
5. Bewegen Sie den Sitz langsam ein wenig nach oben (achten Sie auf Kabel, die Sie vielleicht vergessen haben abzustecken, nicht mit Gewalt), und suchen Sie nach einem O-Ring (Omega), der die 2-3 Kabel zusammenhält. Lösen Sie diesen und legen Sie die Kabel frei. 🥳
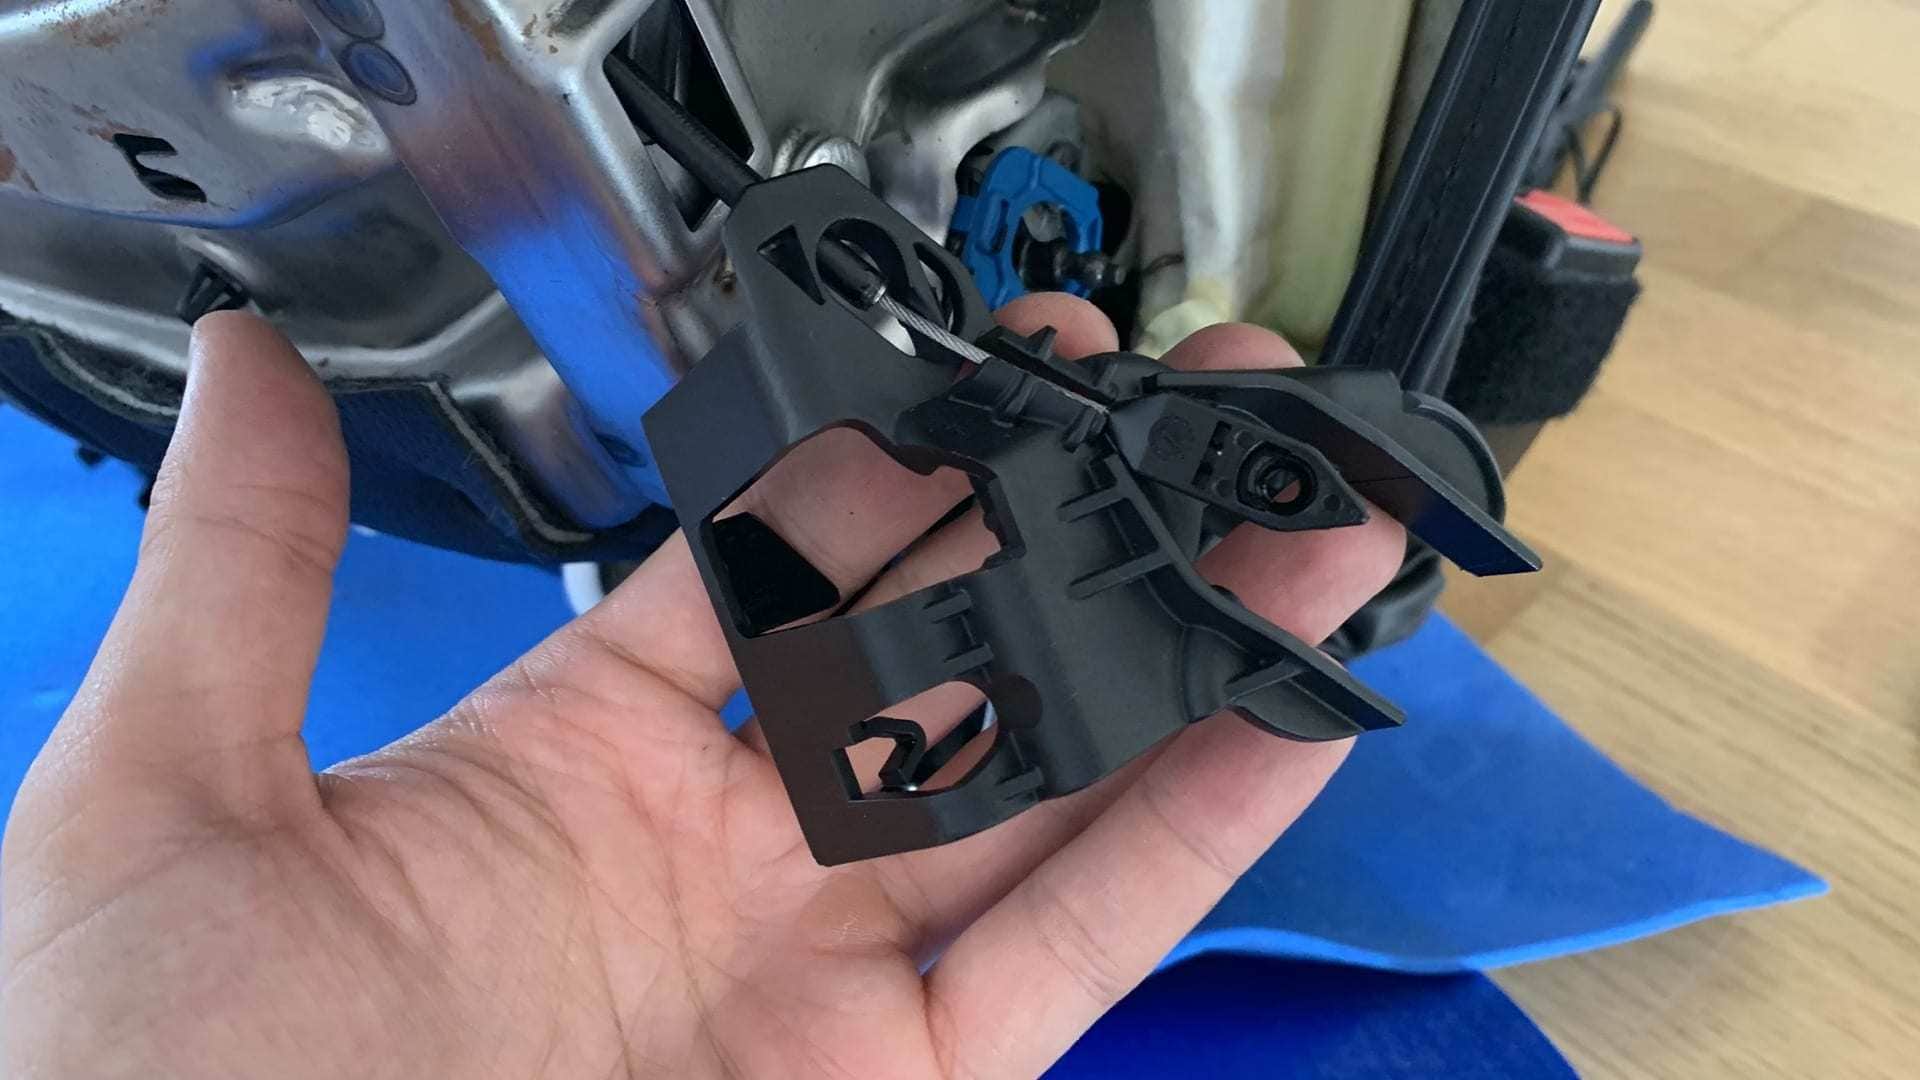
6. Ziehen Sie nun den Sitz nach oben und führen Sie dabei langsam die Kabel zu. Am einfachsten ist es, wenn Sie ein Kabel nach dem anderen ziehen und dann fortfahren.
7. Legen Sie den Sitz auf die Seite. Sie sind fertig. Trinken Sie noch etwas. 🍻
Machen Sie auch einen Freudentanz, Sie haben es fast geschafft. 🕺🏻
3. Wie man das Unterteil des eigenen Sitzes entfernt
Was Sie brauchen:
- T50, T25 Schraubendreher
- Schraubendreher mit flachem Kopf
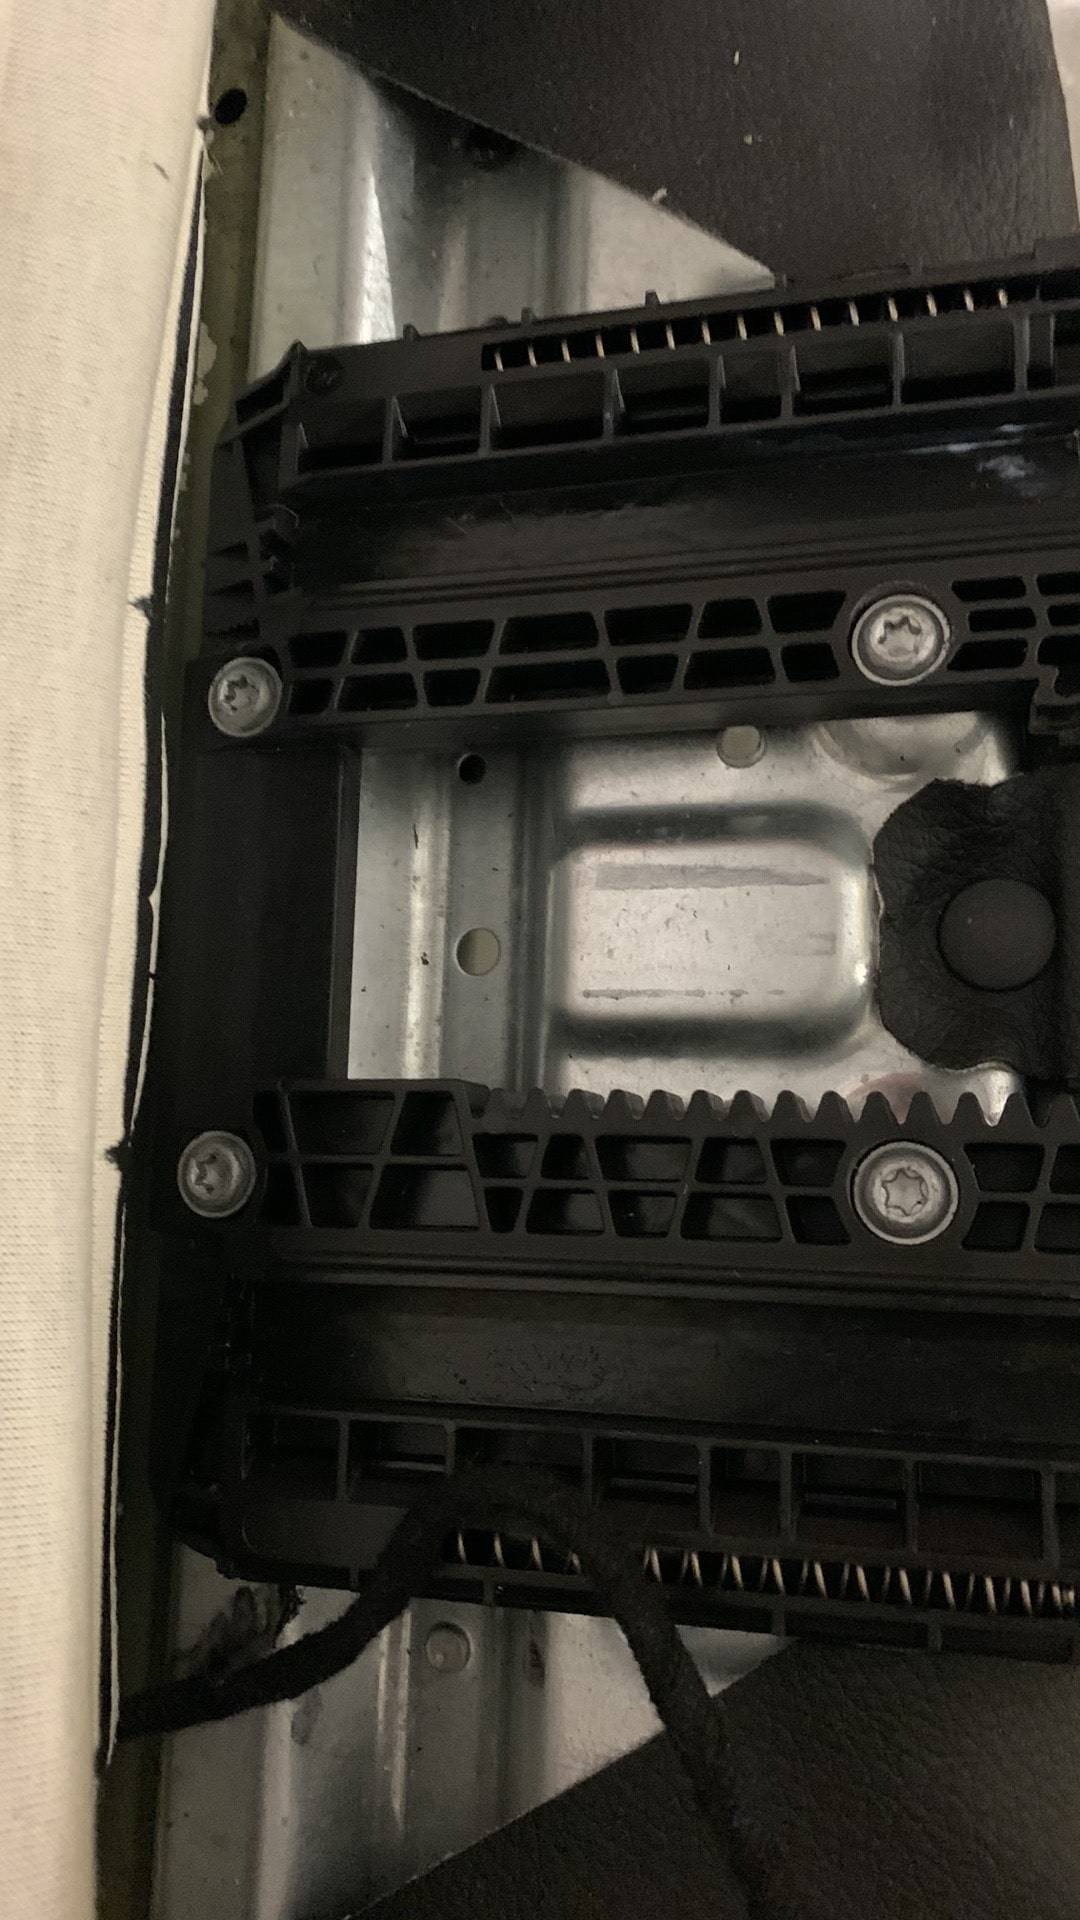
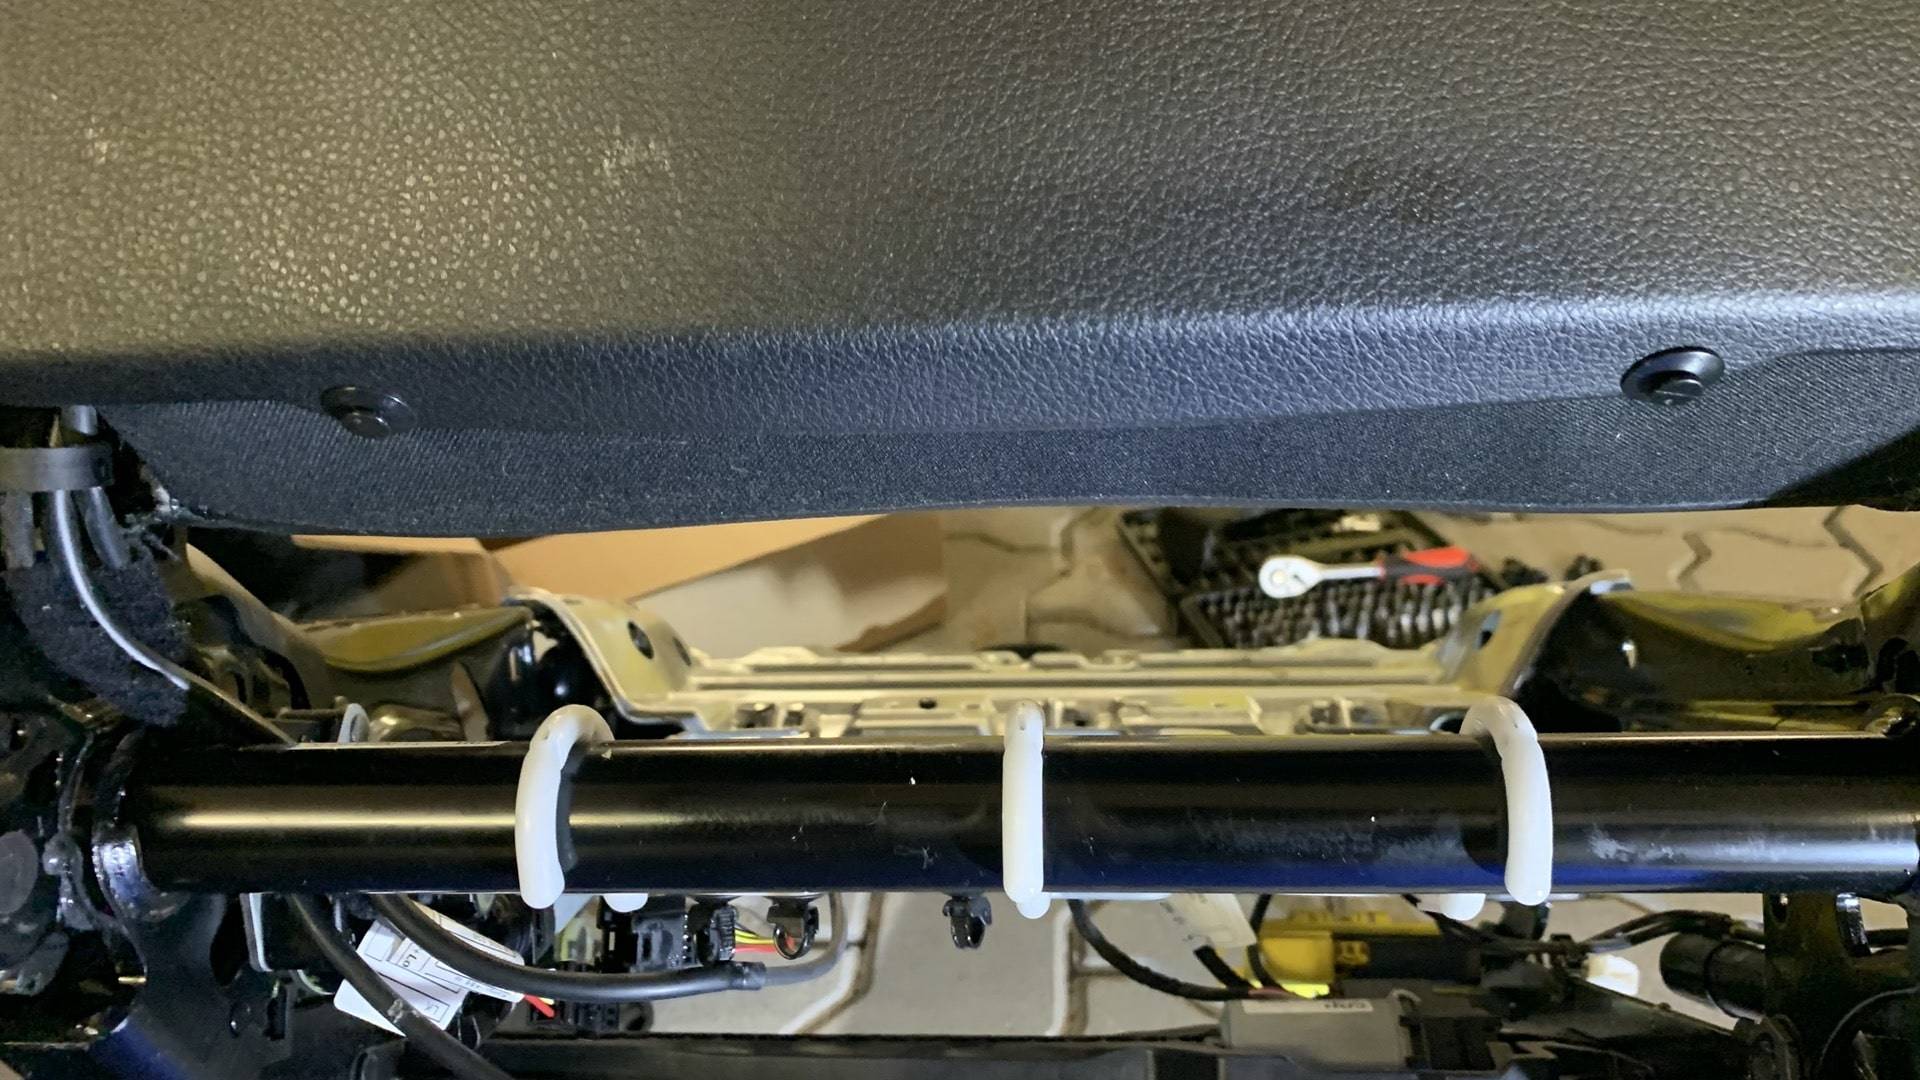
- Entfernen Sie die Sitze. Dazu benötigen Sie eine T50 und einer Brechstange, um die Schrauben zu lösen, bewegen Sie den Sitz nach hinten, um die 2 Schrauben an der Vorderseite freizulegen, schrauben Sie sie ab, bewegen Sie ihn dann nach vorne und wiederholen Sie das Gleiche für die 2 Schrauben an der Rückseite. Denken Sie daran, dass diese Bolzen ersetzt werden müssen.
2. Klemmen Sie den Minuspol der Batterie ab. Warten Sie ~5-10 Minuten.
3. Heben Sie den vorderen Teil des Sitzes etwas an und ziehen Sie den gelben Stecker unter dem Sitz ab.

4. Es ist an der Zeit, den Sitz herauszuheben. VORSICHTSMASSNAHMEN. Wenn Sie sich dabei nicht wohl fühlen, holen Sie sich Hilfe oder legen Sie viele Handtücher auf das Armaturenbrett, das Lenkrad und die Türkarten. Die beste Methode - die bei uns funktioniert hat - ist, den Sitz mit einer Hand unten und mit der anderen hinten zu fassen und ihn langsam herauszuziehen, so wie Sie Ihre Freundin/Ihren Freund herausheben würden. Heben Sie ihn ein wenig an, und drehen Sie ihn heraus, während Sie sich langsam zurückziehen.
5. Führe einen Freudentanz auf, wenn alles in einer Form ist.
6. Wenn Sie eine Oberschenkelstütze haben, werden Sie diesen Teil hassen, wenn Sie ihn nicht auslassen. Um die Oberschenkelstütze zu lösen, müssen Sie sie zunächst vollständig ausfahren und das Leder entfernen, das den Sitz mit ihr verbindet (den "Krümelsammler"). Wie beim Sitzbezug hebeln Sie ihn vorsichtig heraus, indem Sie auf einer Seite beginnen, ihn eindrücken und dann herausdrehen.
Sobald Sie das haben, hören Sie nicht auf. Jetzt kommt der "lustige" Teil, Sie müssen die Oberschenkelstütze selbst zu entfernen, das ist ein Kunststoffteil, und Sie werden zwei kleine schmalen Kopf Schraubendreher oder einige Pry Tool benötigen. Was Sie tun müssen, ist im Grunde, müssen Sie die Zähne dieses Kunststoffteil in drücken, so dass Sie es herausschieben können.
Der Trick ist, sie nicht ganz herauszuschieben, genau wie bei 90%. Dann kann man die Schraubendreher von jeder Seite eindrücken und die Oberschenkelstütze langsam herausschieben. Es ist ein Schmerz und Sie kann etwas kaputt gehen. (Machen Sie sich nicht zu viele Sorgen, das brauchen Sie auf Ihren M2-Sitzen nicht. Es könnte eine gute Idee sein, um Hilfe zu rufen. Sobald es heraus ist, müssen Sie 4 Schrauben abschrauben - T25 - und entfernen Sie das Leder, mit dem es umwickelt ist, und legen Sie es zur Seite.
7. Wenn Sie diesen Kampf nicht haben, oder Sie sind fertig, lassen Sie uns weitermachen und entfernen Sie die Kabel und den unteren Teil des Sitzes. Die Vorgehensweise ist ähnlich wie bei Ihren Spendersitzen. Entfernen Sie die Kabel aus dem gelben Stecker (wir haben festgestellt, dass es am besten ist, wenn Sie einen kleinen Schraubenzieher zwischen die Plastikstecker - blau, weiß - stecken und die kleinen Klammern lösen und mit dem Schraubenzieher herausdrücken). Sie müssen die Sitzheizung abklemmen, wenn Sie eine haben, und mit dem nächsten Teil fortfahren.
8. Wiederholen Sie den Schritt: 1.5, 1.6, 1.7 und 1.8
9. Und der Sitz ist draußen. Juhuuu. Freudentanz! 🕺🏻
4. Entfernen Sie den Rückenrahmen Ihres eigenen Sitzes - F30
Das brauchen Sie dazu:
- Stemmwerkzeuge
- T40-Schraubendreher
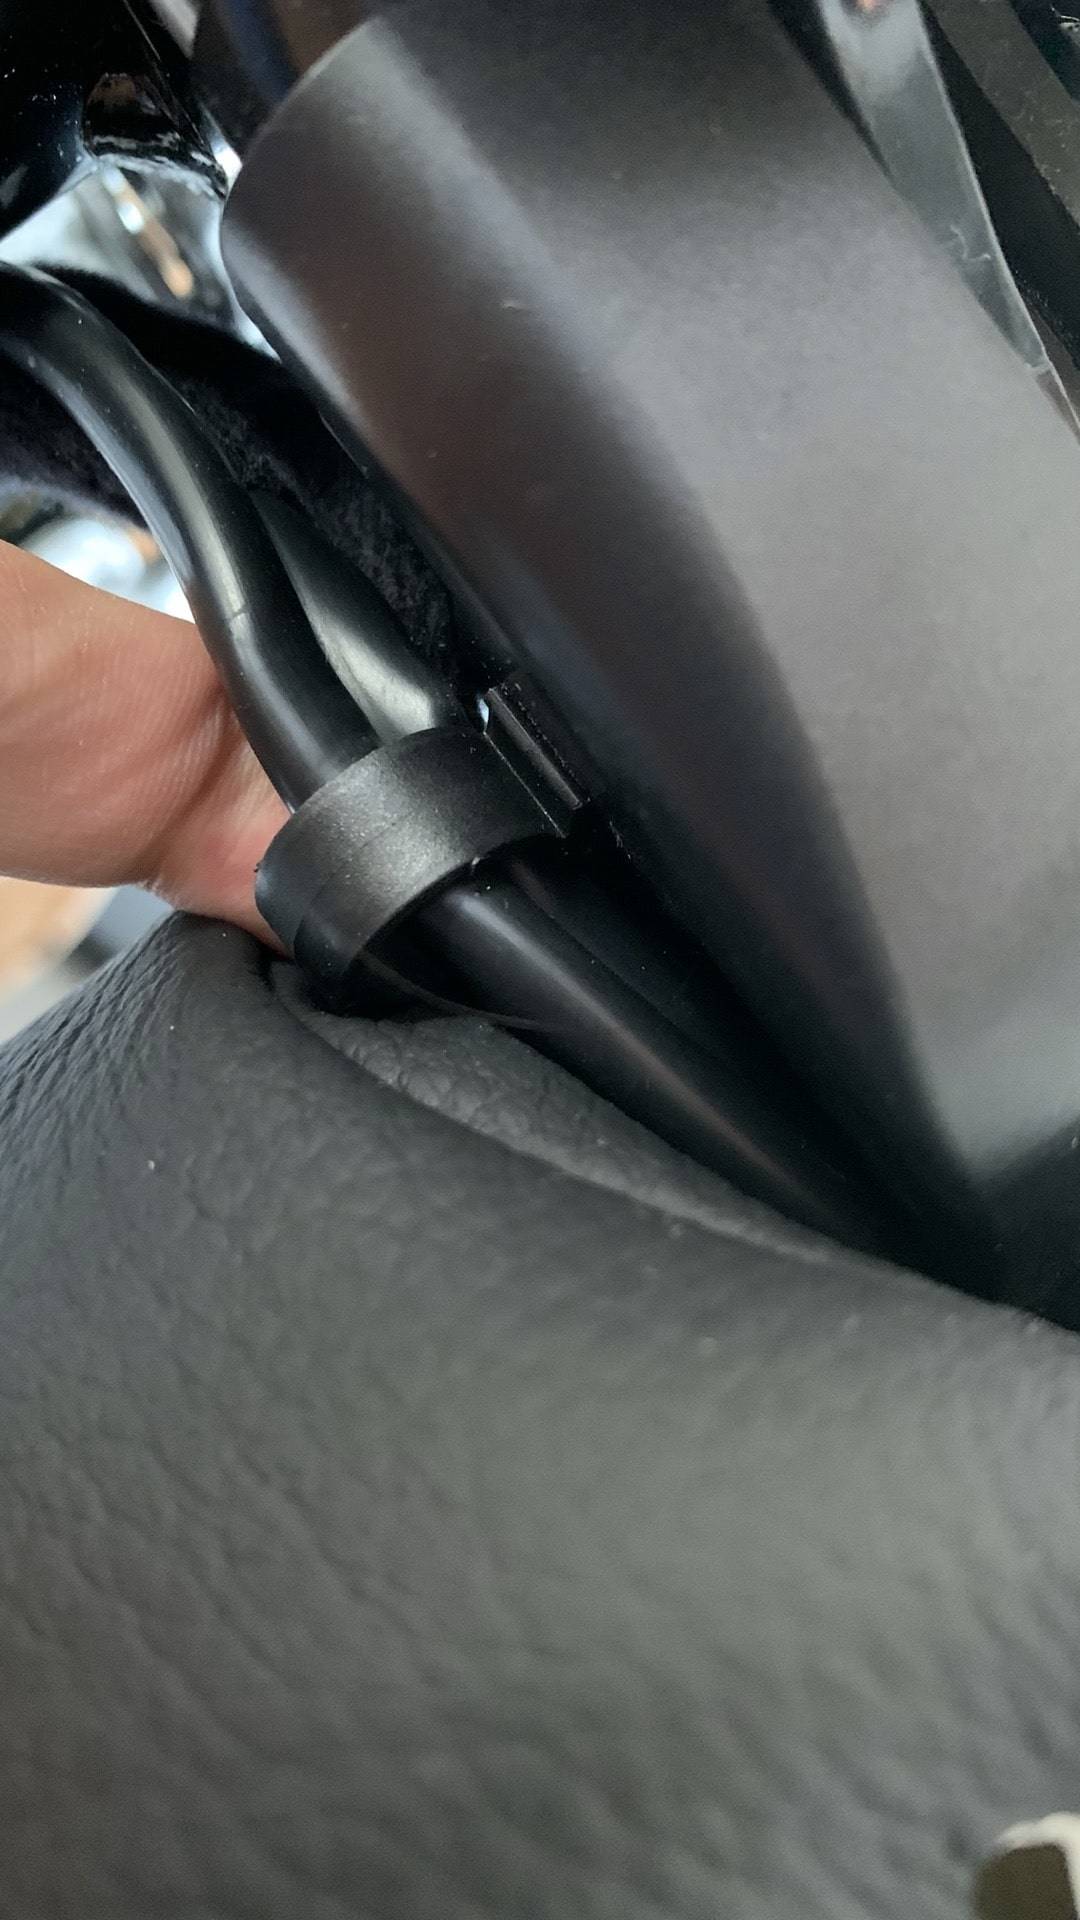
- Entfernen Sie die 2 Stifte, mit denen die hintere Abdeckung befestigt ist. Hebeln Sie sie einfach heraus. Ziehen Sie die Abdeckung nach unten und wackeln Sie sie auf jeder Seite heraus.
2. Lösen Sie das Leder an den Seiten. Drücken Sie es vorsichtig hinein und drehen Sie es nach außen. Am einfachsten ist es, wenn Sie die Seite des Sitzes zu sich heranziehen - und das Leder nach innen ziehen - und es oben ausklipsen, dann mit einem flachen Kopf oder einem Stemmeisen an der Naht nach unten drücken und es freilassen.
3. Entfernen Sie den Airbag. Wenn Sie einen neuen haben oder Ihre Spendersitze mit ihm kommen, überspringen Sie dies, obwohl, wenn Sie neue Airbags oder Gurtstraffer installieren, erhalten Sie einige Fehlercodes und Sie müssen sie heraus codiert zu bekommen. Sie benötigen einen 10-mm-Steckschlüssel und entfernen Sie die Schrauben an der Seite. Verwenden Sie die Muttern nicht wieder.
4. Als Nächstes lösen Sie vorsichtig das Leder aus den Klammern, damit Sie die Seitenwangen verschieben können. Nehmen Sie den Airbag vorsichtig heraus. Achten Sie auf die 2 Schrauben und die Klammer, die ihn am Rahmen hält, brechen Sie sie nicht ab (sie befindet sich oben am Airbag). Bewegen Sie ihn noch nicht, sondern legen Sie ihn sicher ab, denn wir müssen erst das Kabel herausführen.

5. Bewegen Sie es zu den Seiten, werden wir den oberen Rahmen mit 1 Schraube auf jeder Seite abschrauben - T40. Sobald Sie das haben, stellen Sie sicher, dass alle 3 Drähte (Sie können mehr oder weniger haben) und entfernen Sie den Omega-Stecker, dann langsam heben Sie den oberen Teil aus. Dasselbe wie bei Ihrem Spendersitz.
6. Freudentanz, Sie sind fertig. 🕺🏻
An diesem Punkt sind Sie im Grunde fertig, Sie müssen nur noch alles wieder zusammenbauen, in umgekehrter Reihenfolge wie hier. Und vergessen Sie nicht, den Airbag mitzunehmen 😉 .
Wir empfehlen, zuerst mit dem unteren und dann mit dem oberen Teil zu beginnen, damit es etwas einfacher ist, sie wieder zusammenzusetzen.
Eine weitere Sache, die Sie tun können, je nach Ihrem OCD-Level, ist, die M2/M3/M4-Plaketten zu ändern oder abzudecken. Sie können sie entweder verpacken, mit Aufklebern versehen oder so lassen, wie sie sind.
Denken Sie daran, die Schrauben zu ersetzen, die ersetzt werden mussten. Viel Spaß mit Ihren neuen Sitzen. 😎